Suppose the organization has multiple resources and applications to be accessed by any user then it becomes very difficult to access those apps with different usernames and passwords. To avoid such issues the SSO is implemented.
SSO setup is available in salesforce to facilitate you to ”Log In Just Once”. That is once you login on any of authorized applications you will not need to enter your credentials again while using any of the connected apps as you will be automatically logged in all the applications. It gives the facility to your internal employees an external user to do hassle free access to all the applications and they do not need to remember the other credentials for individual apps.
Single sign-on setup in salesforce allows all the authorized users to access the connected apps using a single username and password. It allows the users to authenticate multiple network resources.
Benefits of SSO
1. Saves Time: It takes 5-20 secs to login into another app by putting on the username and password on the place may take longer if you get the need to reset the password in case you forgot the password.
2. User adoption of Salesforce Increases: Users are adopting Salesforce just because of ease of logging in different apps and reduced frustration of typing in the credentials.
3. More Secured: Single time Authentication of credentials validity is more secured. All password policies established in the corporate network are tracked in Salesforce.
4. Existing asset is sufficient: Salesforce authentication delegates the use of LDAP database to manage the user identities. The users lose the ability to access the company data when they leave the org.
5. Decrease in administrative costs: The SSO allows the access to multiple apps by the single set credentials so the less requests are raised for the reset of forgotten passwords and so the need of administration is lesser.
Pre-requisites for SSO setup?
Step:1 Federation ID: It is a user’s unique identification available on User Details.
Step:2 Self- Signed Certificate
Step:3 SSO provider information
Step:4 Link the Identity Provider to Salesforce
Obtain the Federation ID
1. Go to the Quick Find Box
2. From setup, Go to the Users
3. Select a User to edit
4. Enter the unique Federation Id in the given textbox, You need to use the same for that user in all orgs.
5. Save the changes.
Get a Self- Signed Certificate
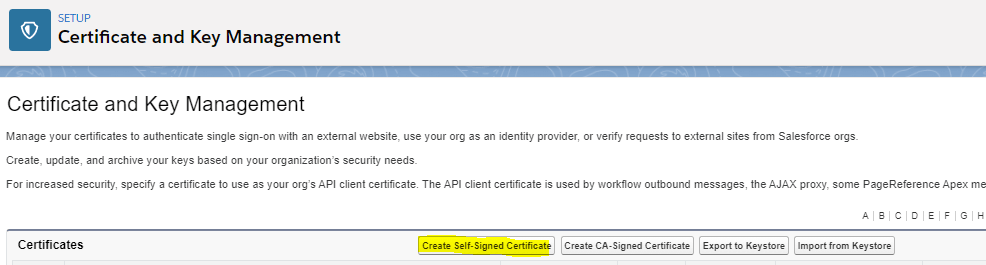
1. Go to Setup
2. In Quick Find box type Certificate.
3. Click on Certificate and Key Management in security control
4. Go to Certificate and Key Management
5. In the certificate section click on ‘Create self-signed certificate’. provide a label and click on save.
Get the SSO provider information
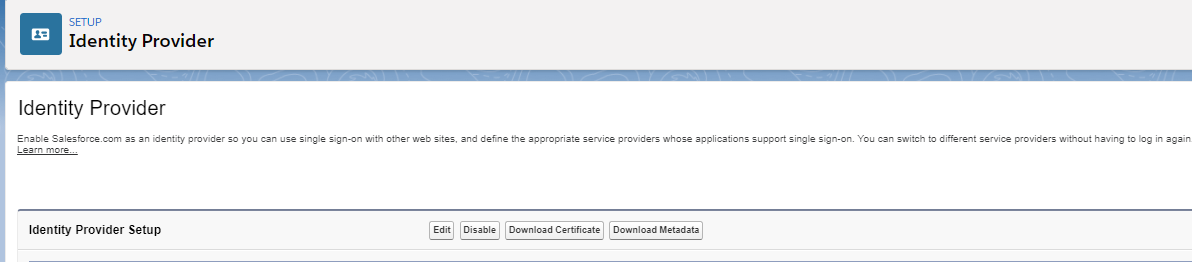
1. In Quick Find box type identity.
2. Click on ‘Identity provider’
3. Configure the identity provider setup and upload the certificate
4. Enable identity provider (if the identity provider setup is done already)
Link the Identity Provider to Salesforce
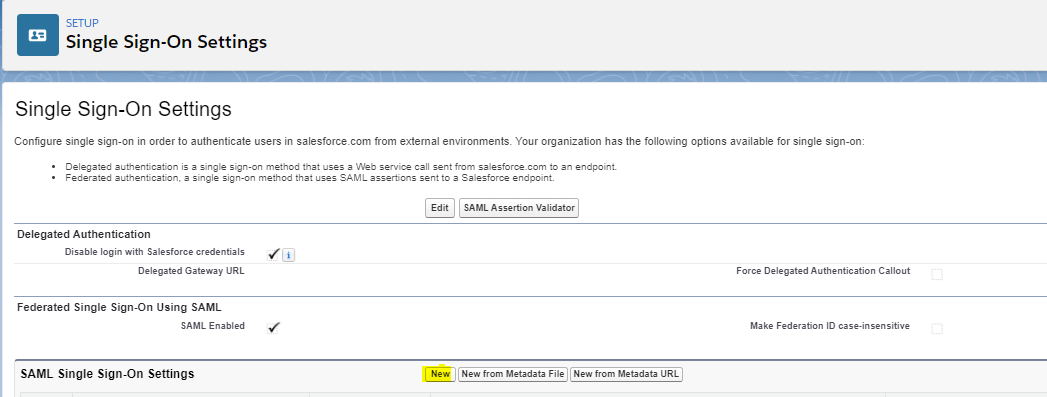
1. Go to single sign-on settings
2. Check the SAML ENABLED checkbox if unchecked (It should be checked).
3. Click on new and configure SAML Single Sign-On Settings
4. Fill the following fields as shown according to the information
5. Click on Setup ->Go to build-> Create->Apps
6. Click on New in Connected apps
7. Fill all the information.
8. Repeat step 6 for other Apps if needed.
All above steps are required to the SSO implementation in Salesforce. You just need to follow such simple configurations in your Salesforce Org, and you will be able to use SSO for external apps those will be available as the Connected Apps once the setup is done.
For more about the SSO in Salesforce and the best practices you can go through the link given below: https://help.salesforce.com/articleView?id=sso_tips.htm&type=5
Leave A Comment