Having all your service channels in one place makes handling client inquiries easier. Service channels include a range of communication channels, including text messaging, phone conversations, email, web forms, web chat, and social media exchanges. Providing multichannel support guarantees that clients may contact you via their preferred way, increasing accessibility and ease of use.
But switching between stations might be intimidating. By combining these channels into a single Service Console with Service Cloud, you can allow agents to navigate easily while maintaining compliance with your business procedures. Because of this connection, support procedures are streamlined, and agents can help consumers no matter how they first contact them. Omni Channel enters the picture at this point.
Effective case management is essential in the customer service field. Efficiently assigning cases to the appropriate agent or team can greatly improve customer contentment and efficiency. Salesforce, a well-known CRM software company, provides a potent remedy for this problem with its Omni Channel function. Businesses may optimize their case management procedures and provide their clients with outstanding service by utilizing automation and intelligent routing tools.
An Understanding of Salesforce’s Omni Channel:
The intelligent distribution of work items, such as cases, leads, and chats, among available agents or teams according to predetermined criteria is made possible by the complex technology known as Omni Channel. It works by assigning work items to the best agent or team, which guarantees efficient use of resources and quicker resolution times.
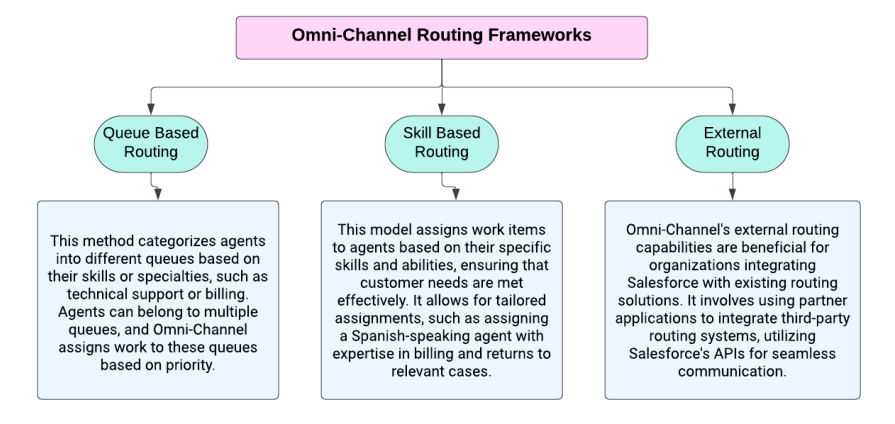
Omni Channel Routing Frameworks:
Let’s look at the different routing frameworks that omni channel supports.
 Advantages of Omni Channel Case Routing Automation:
 Advantages of Omni Channel Case Routing Automation:
1) Enhanced Productivity:
Assigning cases manually can be laborious and prone to mistakes. By automatically routing cases to the appropriate agent based on criteria like skill set, availability, and workload, Omni Channel automation lowers response times and boosts overall productivity.
2) Improved Customer Experience:
Clients anticipate prompt, individualized assistance. Businesses can boost customer loyalty and retention by providing faster outcomes and more fulfilling experiences through the automatic assignment of cases to agents with the requisite competence.
3) Optimal Work Distribution:
To ensure a balanced workload and avoid bottlenecks, Omni Channel intelligently assigns cases to agents or teams. This proactive strategy keeps service levels constant even during peak periods and avoids agent burnout.
4) Real-Time Visibility:
With thorough dashboards and reporting, managers can view real-time information on case volumes, agent performance, and service levels. With this knowledge, they can see trends, allocate resources more efficiently, and make data-driven decisions that lead to greater results.
5) Scalability and Flexibility:
As companies expand, so do the needs they have for customer care. Because of Omni Channel’s adaptable architecture, businesses can quickly grow and modify their case routing procedures to meet shifting needs and maintain efficacy.
Setting Up Omni Channel Case Routing:
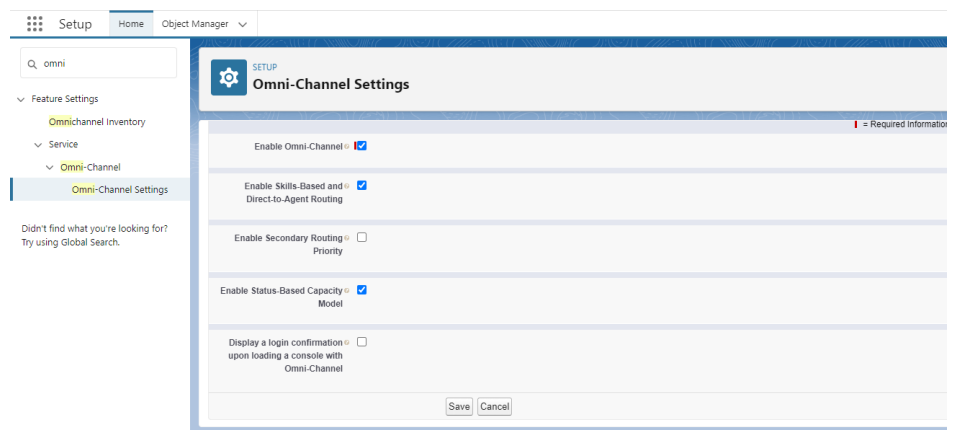
Before diving into Omni Channel case routing, we must ensure a few essential configurations are in place behind the scenes. Here’s what we need to do:
- Create a Queue for Routing Configuration
- Set Presence Status for Users (Available, Offline, On Break)
- Set up the Console App with the Omni Channel utility item
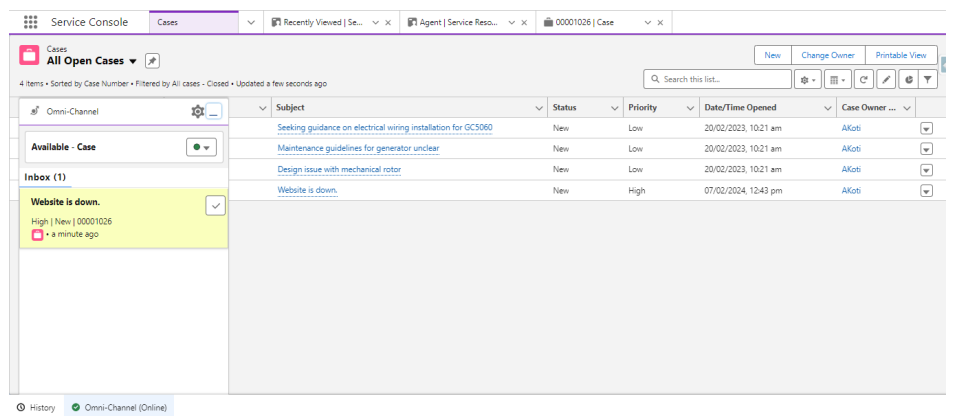
Accept the incoming work with Omni-Channel:
- Case is created, enter subject – ‘Website is Down’.
- Navigate to the App Launcher and select the Service Console. Within the console, locate and click on Omni Channel in the console footer to access the Omni Channel widget.
- Adjust your status to Available – Case.
- Navigate to the Cases tab and modify the list view to display All Open Cases by clicking the dropdown arrow next to Recently Viewed.
- Choose the checkbox beside the case you’ve created and click on Change Owner.
- From the dropdown arrow, select Queues, and then use the lookup to choose High-Priority Cases.
- Click on Submit.
- Upon receiving a notification in the Omni Channel widget, accept it by clicking the checkmark. The case will open in a new tab within your console. Keep this tab open as it will be useful later.
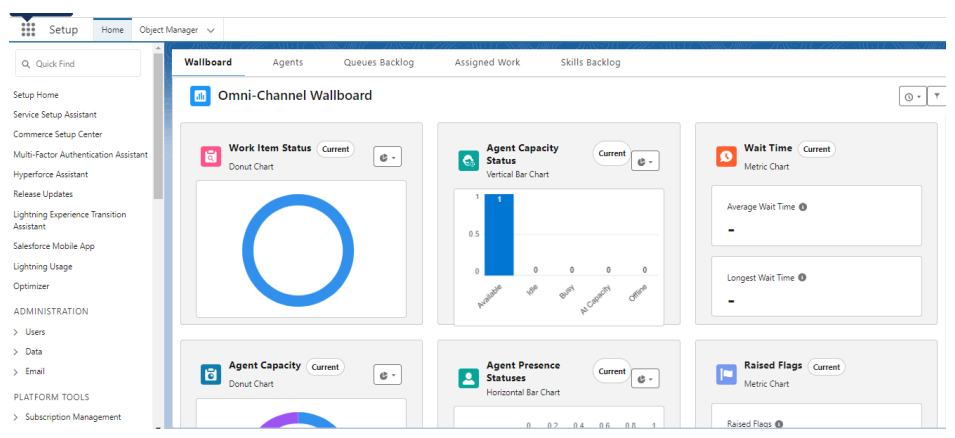
Use Omni Channel Supervisor to Keep an Eye on Your Contact Center:
Managers and supervisors can use Omni Channel Supervisor as a one-stop shop to monitor the state of their call center. With helpful at-a-glance data like wait times, average handle times, active handle times, and more, supervisors can evaluate how their agents, queues, skills, and work items are performing.
- In the Quick Find box, type App Manager from Setup, and then click App Manager. Click the down arrow next to Service Console and select Edit.
- Select the vertical tab labeled Navigation Items.
Look for Omni Supervisor in the Available Items list and add it to the Selected Items. - Click save and click back.
You are all set! Now you can play around with different features of omni channel. Below is the Omni Channel Supervisor Image:
Conclusion:
For businesses trying to improve customer service, automating case routing with Salesforce’s Omni Channel is a potent solution. Through the intelligent assignment of cases to the most qualified agents or teams according to predetermined criteria, firms can increase productivity, boost customer satisfaction, and foster stronger loyalty. Omni Channel automation has the potential to be a key component of effective case management plans in Salesforce-powered systems with proper setup, monitoring, and planning.
Leave A Comment