Integration means in the terms of technology is, add the functionality of others. It somewhere sounds collaboration of two different technology or software products accordingly.
In this blog, we are going to integrate the JIRA with salesforce using webhooks.
Below is the list of key concepts for completing this Jira Salesforce Integration.
- Webhook
- Site
- Apex Web Services
Webhook – It is a kind of user-defined callback over HTTP. It can be used as a notifier which notifies your application when it comes into play. It is a very important part of JIRA to salesforce integration with any other technology.
In simple words, we can say that it kind of triggers which perform some appropriate action when an event occurs in the JIRA. Below is the list of event occurs in the webhook.
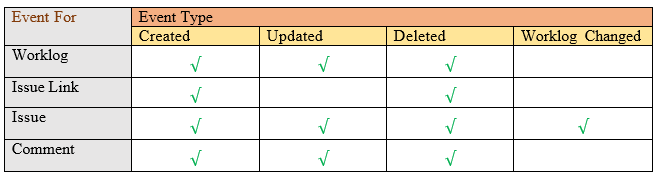
User related events
User
- Created
- Updated
- Deleted
There Are furthermore Types like Project-Related, Jira Configuration-Related, Jira Software- Related and they have their own events also. Which will discuss later?
How To Create a Webhooks?
Login To Your JIRA Account, Go To System Webhooks Or Use Quick Search then type Webhooks
- Click on Create a Webhook.
- A Form will come to screen fill the all required details like Name of the Webhook, Status, URL (It is the endpoint where it will send the Response in the form of JSON) You can also Call It as Endpoint.
- Select the Event On which webhook will fire like Create User, Update User, etc.
- Click on Create.
Note: Don’t Forget to remain ExcludeBody Unchecked if you want to get the JSON body in the response.
Site –
Site in salesforce is used for which you can give access to the VF page to End-Users and You can even call your apex service through an external site. You don’t need to login to access the site in salesforce. It allows you to create public websites and applications that are directly integrated with your salesforce.com without authentication.
Here are the few steps to create a site in salesforce.
- Go To Setup Click on Quick Search Bar and Type Sites in the search bar.
- Create a custom domain first.
- Click on New to create your site after creating a domain.
- Set All the detail in the site like Site Label, Site Name, Active Home Page, etc.
- When You Think Your Site is ready then Activate your Site
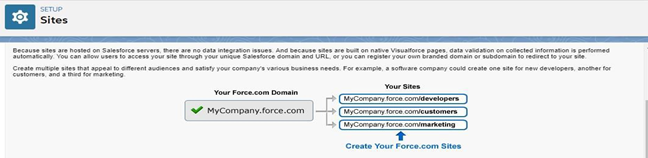
Thus with the help of the site, you can easily call your apex services from a third party website without login Id and Password.
Apex Web Services –
You can perform Rest and Soap web service operations through Apex
Classes. Make your method callable through the web. You have to give global access to all the methods in apex web service. Use the Global keyword before the name of the method to make it globally accessible.
Basic Syntax to create an apex class as a web service.
@RestResource(urlMapping=’/give_any_custom_Url/’) global class Name_Of_Class{
@HttpGet // any annotation as per requirement global static Method_Name(){
// write your code here
}
}
Below is the list of annotation name and description of each annotation.
@HttpGet – Reads or retrieves records.
@HttpPost – Create records.
@HttpDelete – Delete Records.
@HttpPut – Used to update existing records or create records.
@HttpPatch- Used to update fields in existing records.
So now we know all the three key concepts to integrate the JIRA with the salesforce. Integration Task:
Create a record in the salesforce org automatically when we create any user in the JIRA.
Follow the below steps to create a record in Salesforce when we create any record in the JIRA.
Write an Apex Class as Web Service.
Code:
@RestResource(urlMapping=’/myurl/*’) global with sharing class RestTestController {
@HttpPost
global static void CreateRocord() { RestRequest request = RestContext.request; Blob body = request.requestBody;
String bodyString = body.toString();
Map<String, Object> m = (Map<String, Object>)JSON.deserializeUntyped(bodyString); Map<String,Object> objectlist = ( Map<String,Object> )m.get(‘user’);
Object email; Object Fname; Object Uname;
email = objectlist.get(’emailAddress’); Fname = objectlist.get(‘displayName’); Uname = objectlist.get(‘name’); Jira_User__c create = new Jira_User__c(
Username c = Uname.toString(), Name = Fname.toString(), Email_Address__c = email.toStrinote :
);
insert create; system.debug(‘=====’+bodyString);
}
}
Note :
First Create a custom object named as Jira_User. Create three fields Name, Email_Address, and Username
Click on Site Label Public Access Settings Provide access to the object.
Add the Apex class in your site by Public Access Settings Enable Apex Class Access Click on Edit Select the Apex Class from Available Apex Classes and Add the class in Enabled Apex Classes. Save.
Make URL like site-name.force.com/services/apexrest/apex_rest_endpoint/
For example, my URL was https://jiravidish-developer-edition.ap15.force.com/ services/apexrest/myurl/
- Go to your JIRA account create a webhook(as we already create above)
- Finally, click on create.
- Keep the ExcludeBody Unchecked.
- Go to user-related Events and click on create.
- services/apexrest/myurl/
- In the Url paste the above-created URL like https://jiravidish-developer- edition.ap15.force.com/
- Click on enable
- Name the webhook
- Go To User – Management in the JIRA and click on create User and the details of the User and click on Create.
- Go To Your Custom Object in salesforce and you will find a record of the user that you have created in the Jira.
Hello,
I allow myself to contact you today following your wonderful work on the integration of jira to salesforce. I would like to thank you first.
I followed to the letter you steps which were very clear but unfortunately nothing happens on the salesforce side, no record is created as if there was no call . Could you please help me ?
I thank you in advance,
Best regards