The objective of integrating Amazon OpenSearch Service with Salesforce is to enable efficient and seamless data retrieval from Salesforce using OpenSearch API queries. This integration aims to enhance the search experience for Salesforce users, allowing them to search across various objects and fields, leading to more relevant search results. The key challenge lies in ensuring the integration is user-friendly, easily maintainable, and offers real-time search results with minimal latency. Additionally, security, scalability, and cost-effectiveness are crucial considerations.
Prerequisites:
1. Create/Have an AWS account
- Visit the AWS website https://aws.amazon.com/console/
- Click “Create an AWS Account.”
- Provide your personal information, select an account type, and enter billing details.
- Choose a support plan and accept the AWS Customer Agreement.
- Verify your account via phone.
2. Create/Have a Salesforce account
- Visit the Salesforce website https://login.salesforce.com/?locale=in
- click “Try for Free.”
- Choose the Salesforce account type, and provide personal and company information.
- Set up a username and password, enter your phone number, and agree to terms and conditions.
- Complete the account setup, including security settings and organization details.
3. Basic understanding of AWS and Salesforce
- AWS documentation: https://docs.aws.amazon.com/
- Salesforce documentation: https://developer.salesforce.com/docs/
Here are the steps for Integrating Amazon OpenSearch Service with Salesforce:
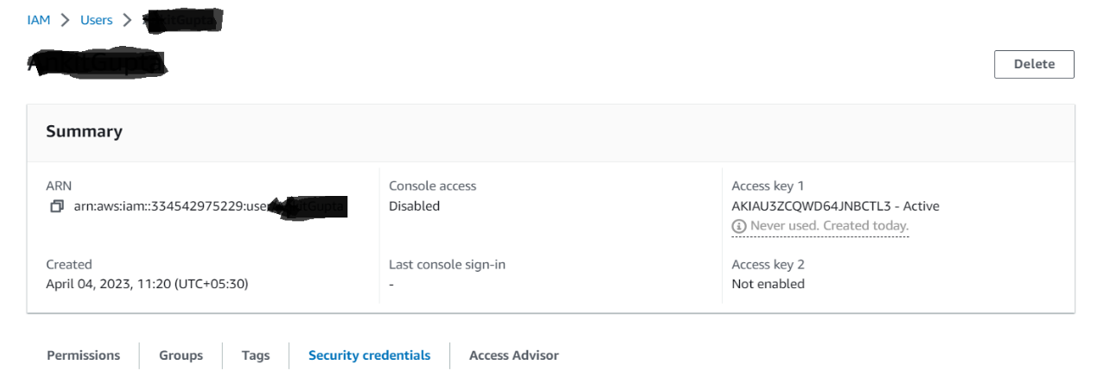
Step 1: Create an AWS Elastic User
AWS Elastic Compute Cloud (EC2) is a cloud-based web service designed to offer scalable and adaptable computing resources. It enables users to initiate and oversee virtual machines, known as instances, as needed. To utilize AWS EC2 instances, it’s necessary to establish an AWS account and configure an Elastic User.
Here are the steps to create an AWS Elastic User
- Open the link: https://us-east-1.console.aws.amazon.com/iamv2/home?region=us-east- 1%23/security_credentials
- Visit the AWS IAM console and navigate to “Access Management” > “Users” > “Add Users.”
- Specify a username and attach the “AmazonOpenSearchServiceFullAccess” policy.
- Review and create the user.
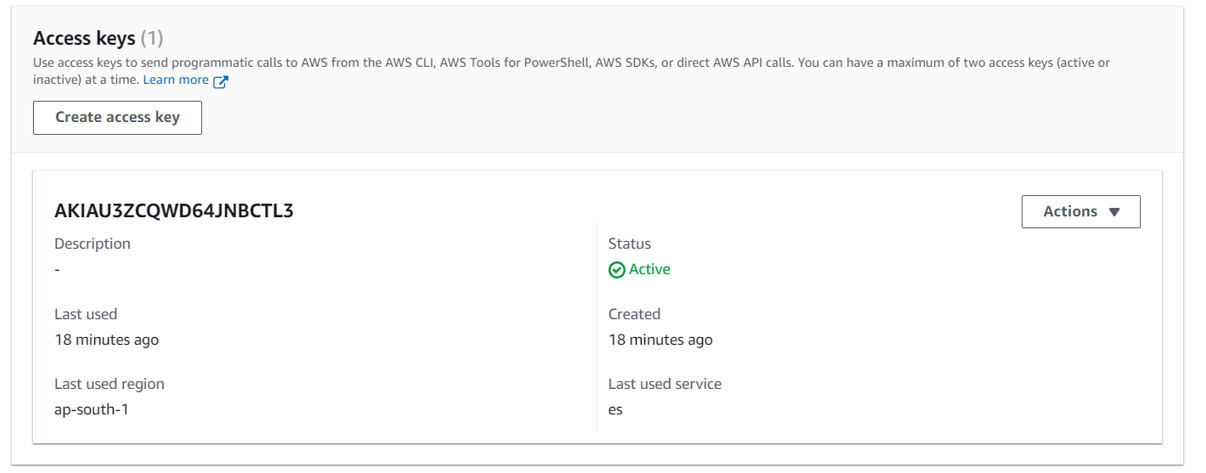
Step 2: Generate Access Keys:
Amazon Web Services (AWS) furnishes users with access keys for secure programmatic resource management. These AWS access keys comprise an access key ID for user or application identification and a secret access key for request authentication through digital signing.
Here are the steps to Create Access keys:
- Click on your AWS Elastic User
- Click on Security Credentials
- Click on Create Access keys
- Application running outside AWS >>Next >>Next>> Done
Step 3: Create an Amazon OpenSearch Service Domain
To achieve this task, start by logging into your AWS (Amazon Web Services) account. Then, go to the OpenSearch Service console. Follow the step-by-step instructions provided by AWS to create your OpenSearch domain.
Here are the steps to Create an Amazon OpenSearch Service domain
- Go to the AWS OpenSearch Service console and follow instructions to create a domain.
- Configure domain settings, including name, instance type, access, IAM ARN, and access policy.
- Note the domain endpoint.
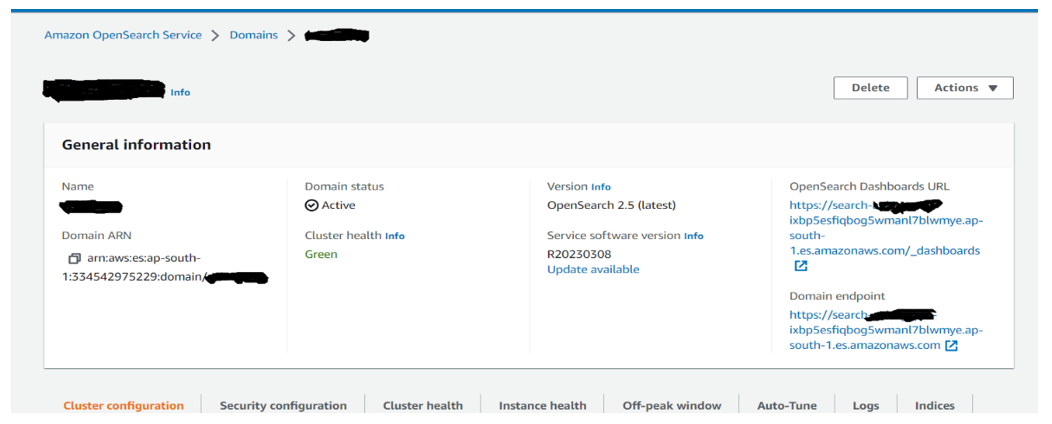
Step 4: Obtain the Endpoint URL
Retrieve the OpenSearch domain’s endpoint URL from the AWS OpenSearch Service console.
Step 5: Create a Named Credential in Salesforce
A named credential is a secure method for storing authentication information and employing it to establish a secure connection with an external service. Named credentials are versatile and can be utilized in a variety of integrations, including Apex callouts, external object definitions, or lightning components.
Here are the steps to Create a Named Credential
- In Salesforce, navigate to Setup > Named Credentials > New Named Credential.
- Enter a name and the OpenSearch domain’s endpoint URL.
- Configure identity type, authentication protocol, AWS access key ID, secret access key, region, and service (es).
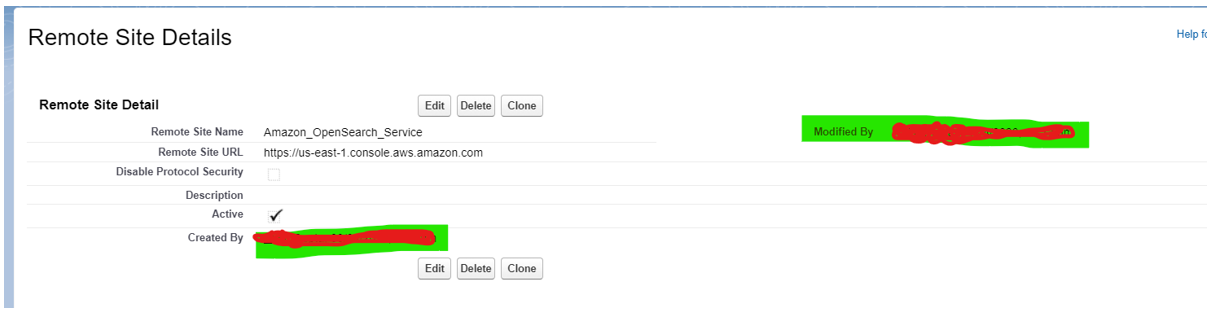
Step 6: Establish a Remote Site Setting in Salesforce:
Establishing a Remote Site Setting within Salesforce is a crucial process when you intend to establish a connection between Salesforce and an external system or service.
Here are the steps to Create a Remote Site Details
From Setup, search for “Remote Site Settings” and create a new remote site with a name and the external service’s URL.
Checked “Active” checkbox.
Step 7: Configure a Content Security Policy Trusted Site
Content Security Policy (CSP) is a crucial security mechanism integrated into web browsers, designed to thwart cross-site scripting (XSS) attacks by imposing restrictions on the types of content a website can load or execute.
Here are the steps to Create a Content Security Policy Trusted Sites
- From Setup, search for “CSP Trusted Sites” and create a trusted site by specifying a name and the URL of the external system or service.
- Use this URL: https://email.ap-south-1.amazonaws.com
- Select appropriate CSP settings and save.
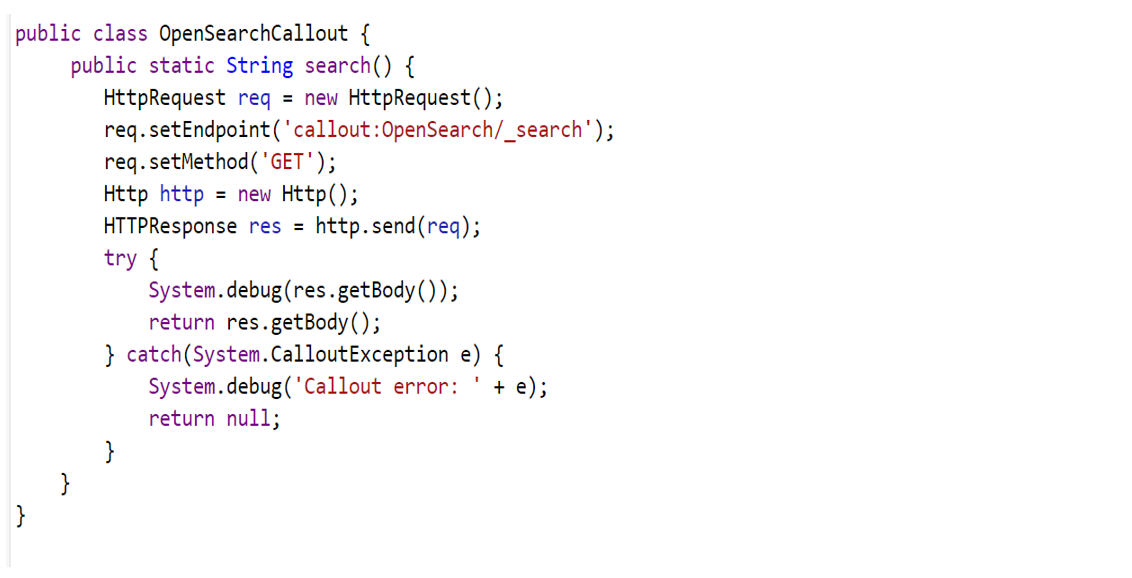
Step 8: Apex Callout Configuration
- For Salesforce to OpenSearch communication, use Apex callouts with the named credential.
Summary:
Amazon OpenSearch Service provides managed search and analytics capabilities. The Salesforce-OpenSearch integration enhances data retrieval and search experiences. This enables users to extract insights from multiple data sources seamlessly, improving decision-making.
Leave A Comment