Salesforce Marketing Cloud Automation Studio is a powerful platform that allows businesses to automate their marketing processes. It provides a range of features and tools that enable marketers to design, execute, and analyze their campaigns effectively. It allows marketers to create custom workflows and automate tasks, such as sending emails, SMS messages, and push notifications, based on specific customer behavior and data.
SFMC Automation Studio: Overview
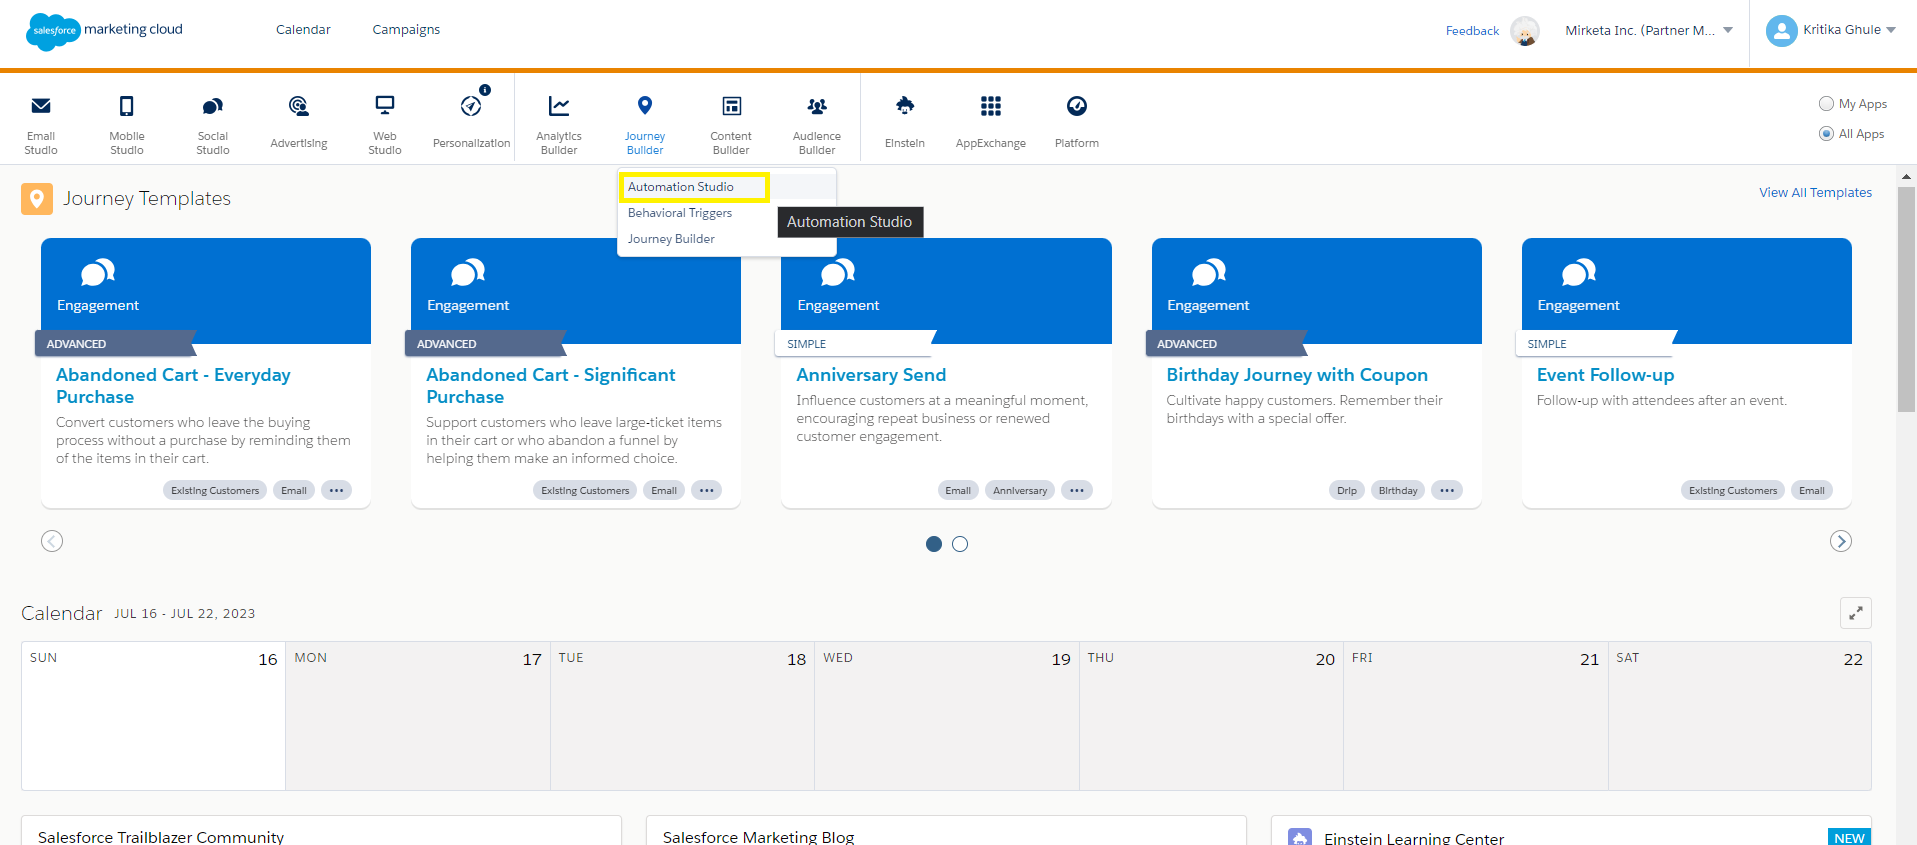
After logging in to the salesforce marketing cloud this is how the marketing cloud dashboard looks, you will notice various tabs that are available based the Marketing Cloud edition you are working on.
Simply click on ‘Journey Builder’ and select ‘Automation Studio’ from the dropdown menu.
This will take you to the Automation Studio homepage, where you can create automated tasks and achieve more targeted and personalized campaigns with less effort.
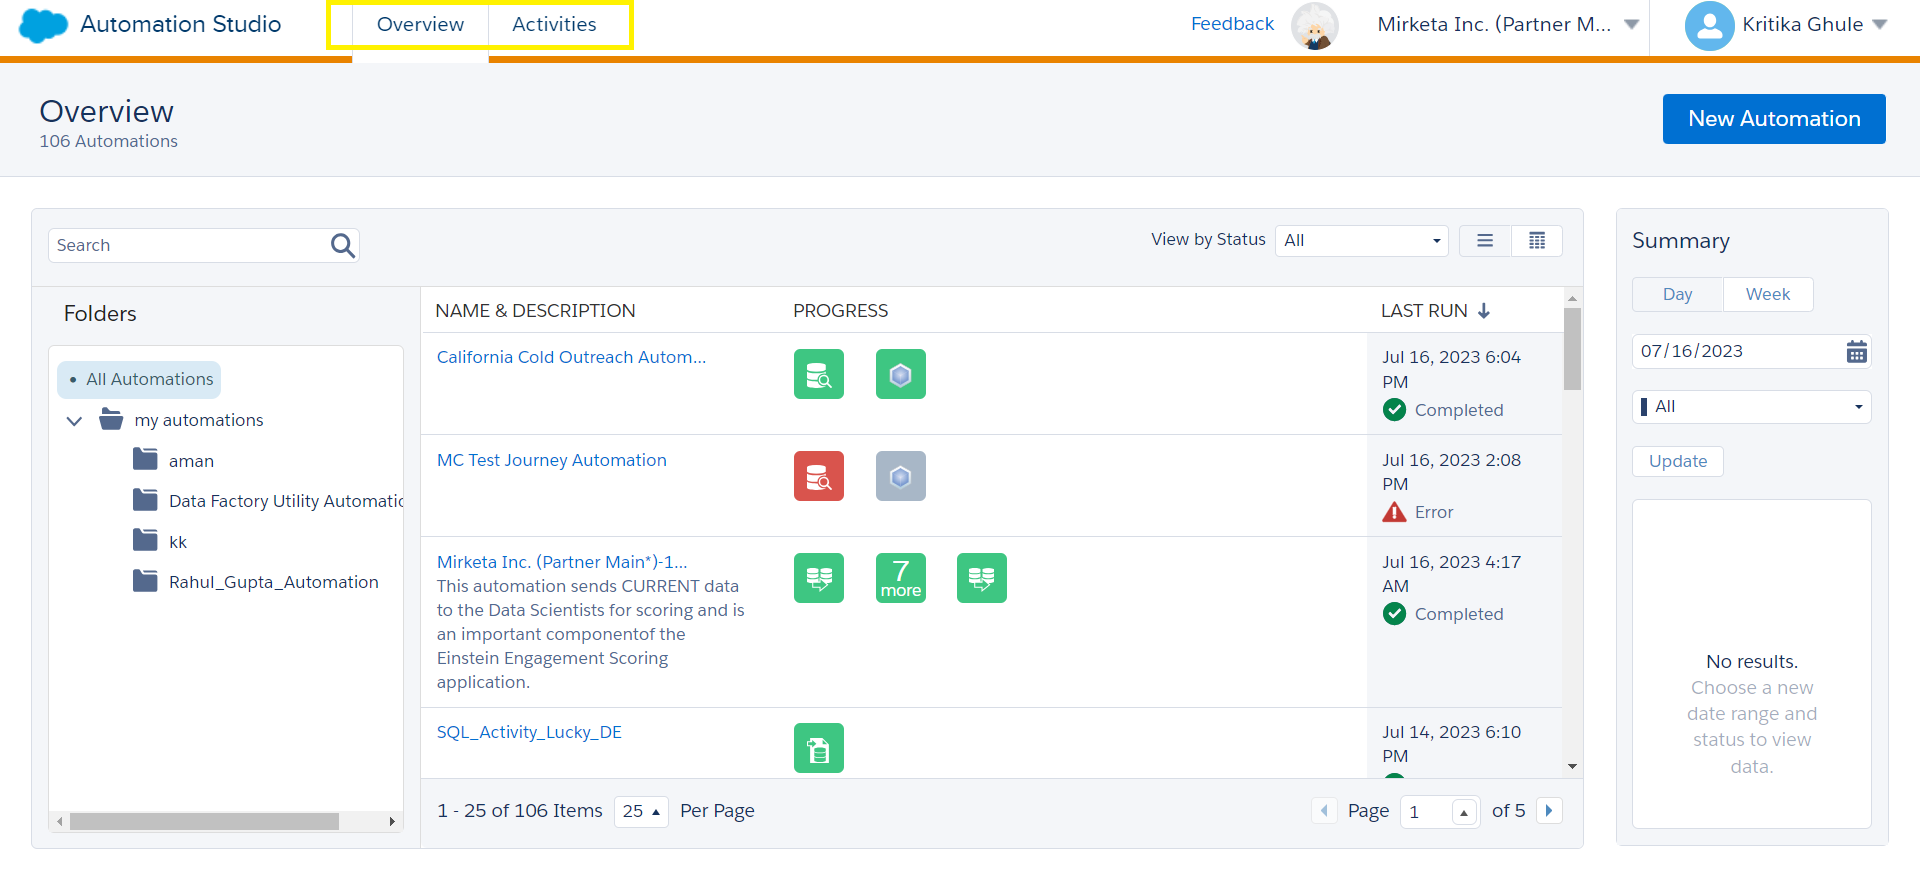
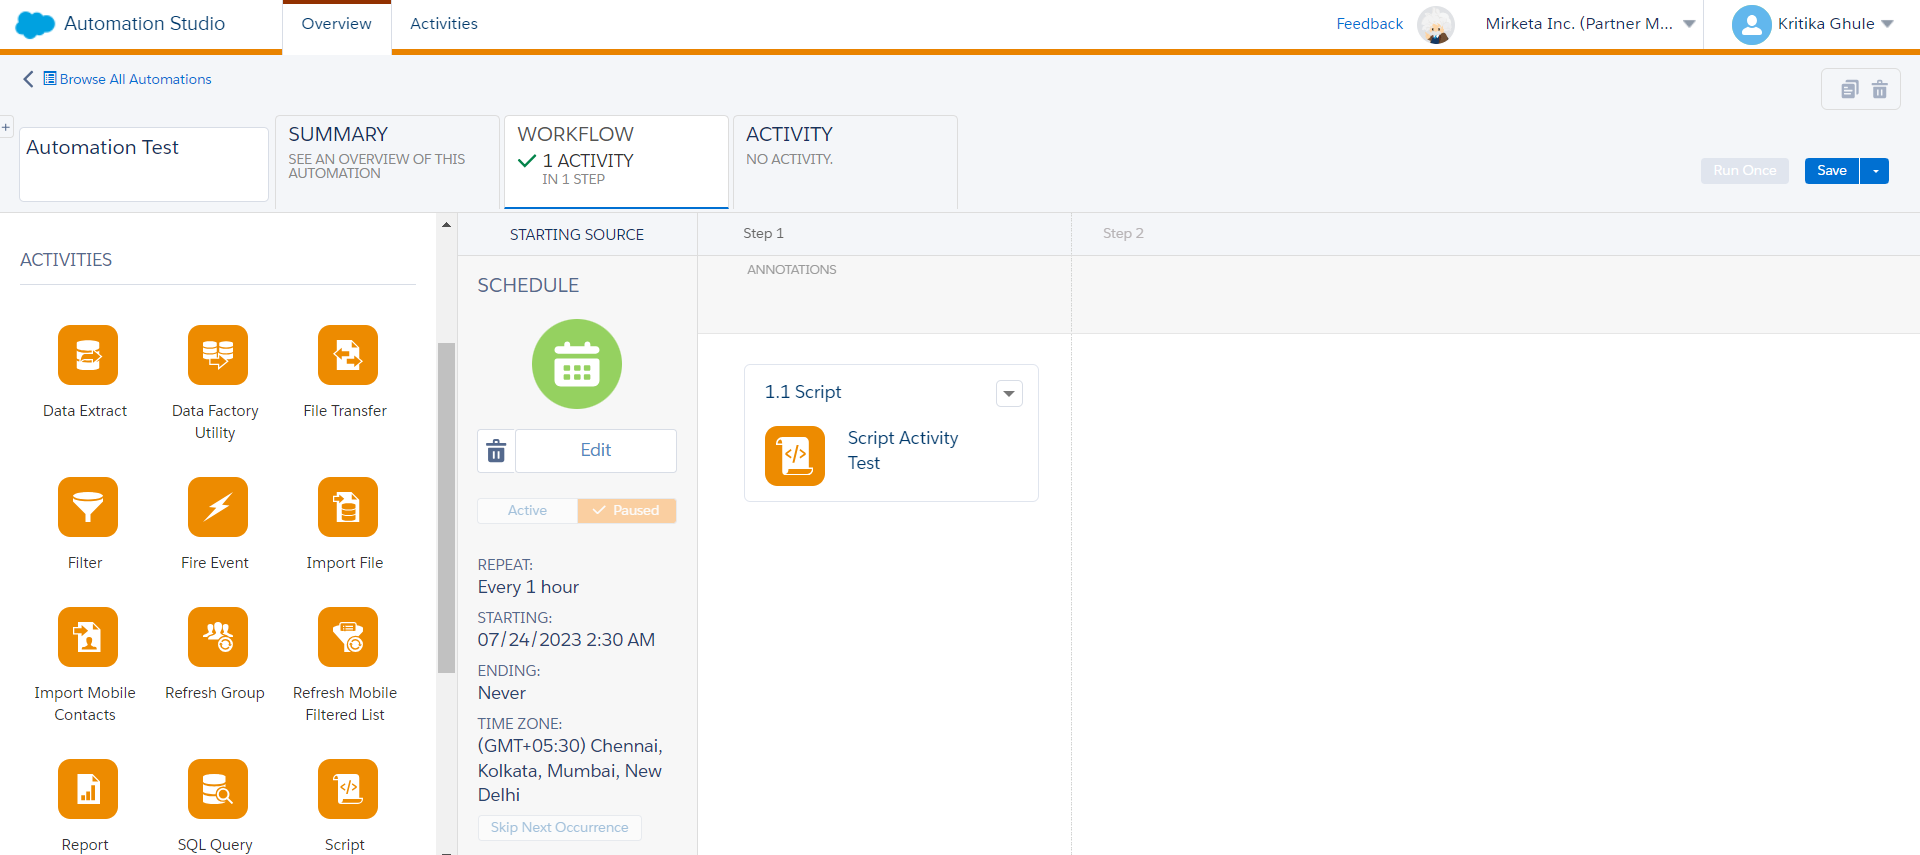
Automation Studio consists of two primary tabs that will help you streamline your automation processes: the Overview and the Activities tabs.
The Overview tab provides a comprehensive view of all your configured automations. Here, you can easily track their progress, identify which ones were run last, and quickly spot any errors that may have occurred.
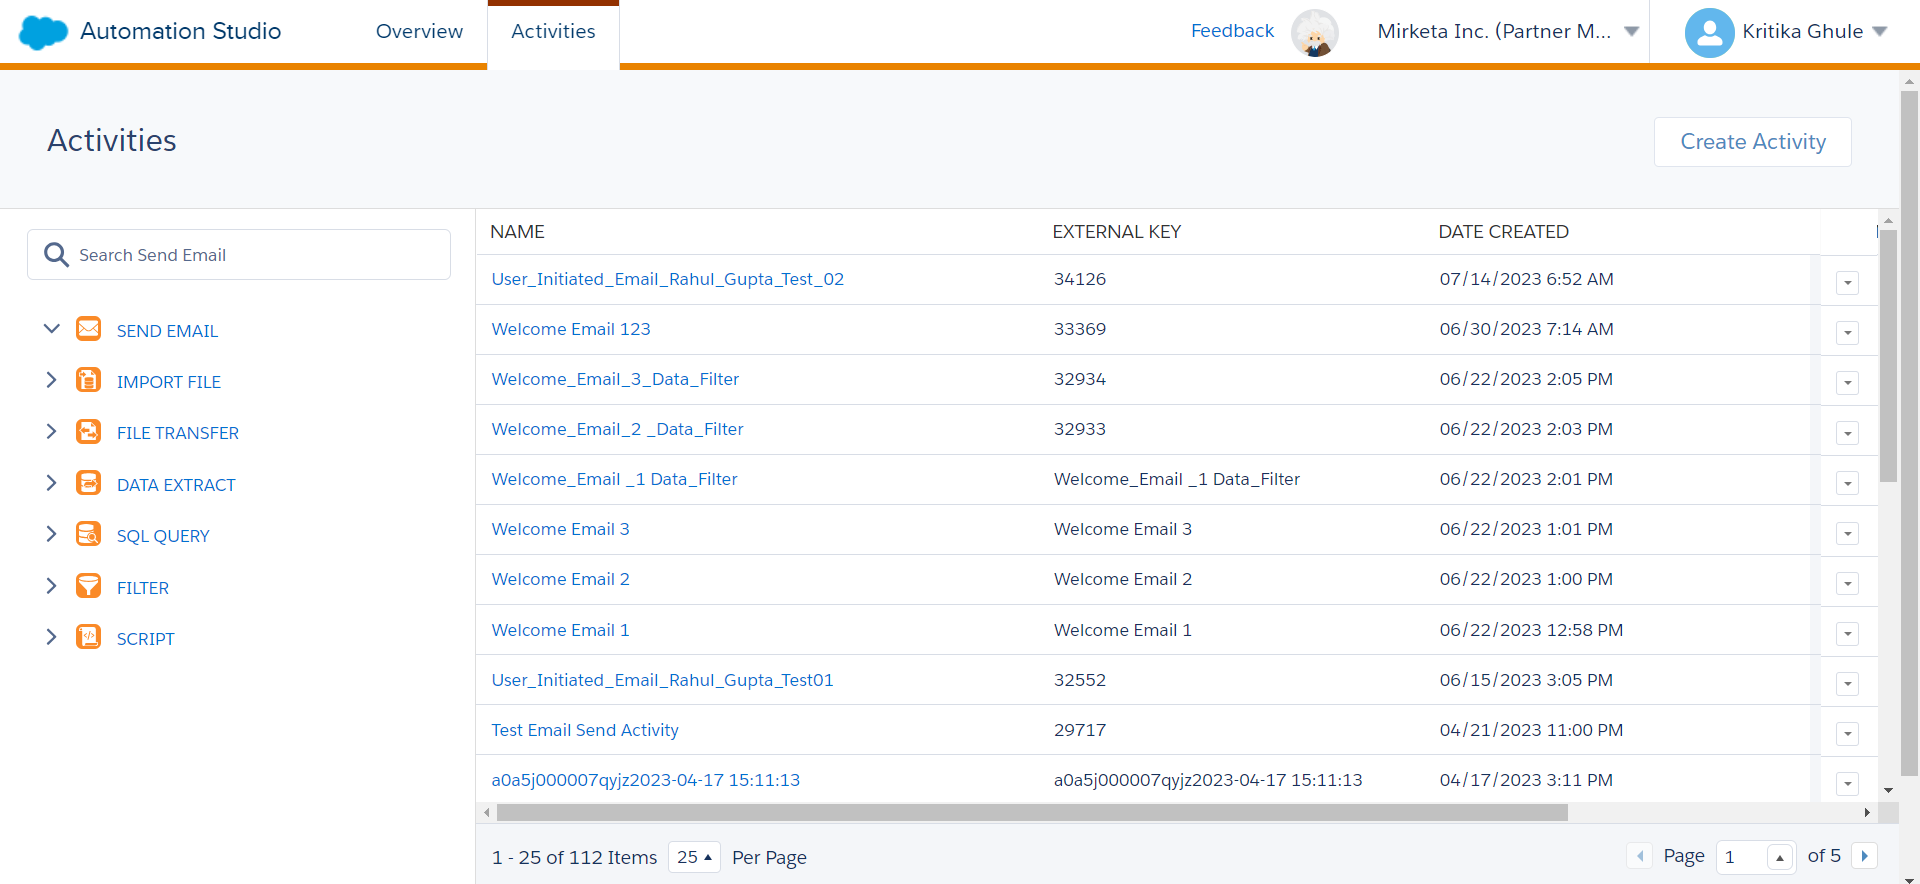
The Activities tab, on the other hand, allows you to define activities that can be reused across multiple automation workflows. This means that you can create a library of pre-configured activities that will save you time and effort in the long run.
But that’s not all. Automation Studio also comes equipped with a folder structure that lets you organize your automations in a way that makes sense for your workflow.
Creating automation in SFMC
Creating automation in Salesforce Marketing Cloud involves the following steps:
1. Navigate to the Automation Studio in SFMC.
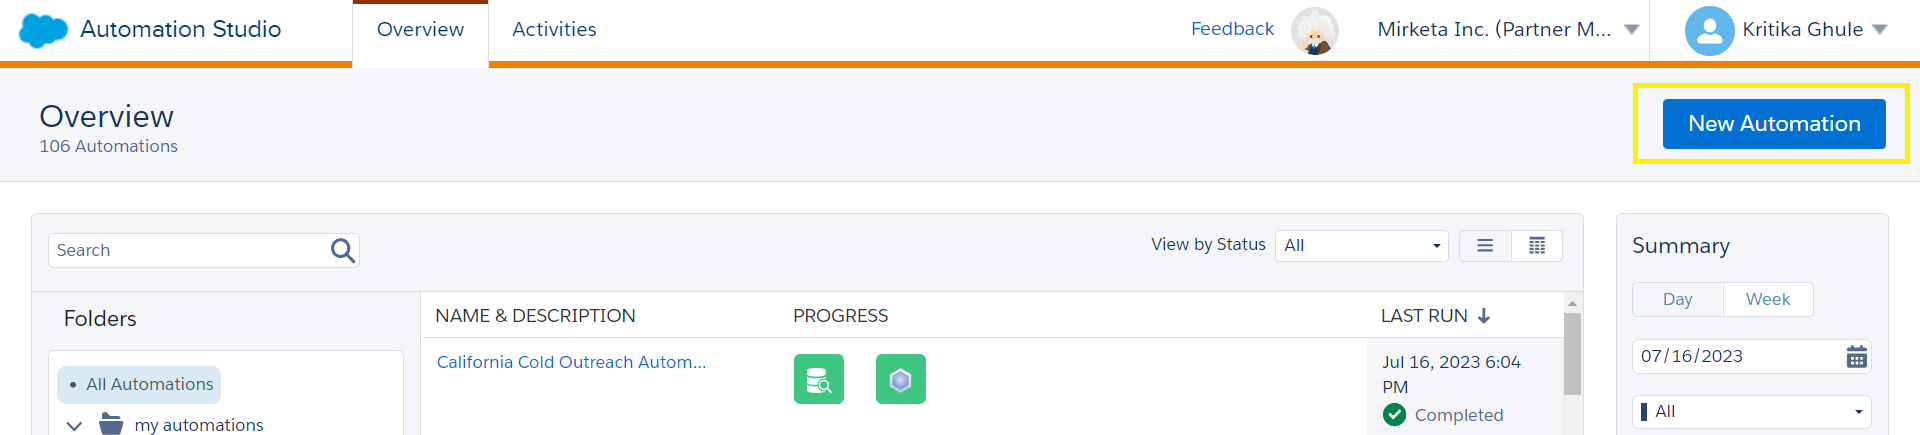
2. Click on the “New Automation” button on the top right.
3. Set the entry criteria for your automation. This determines who or what triggers the automation to start.
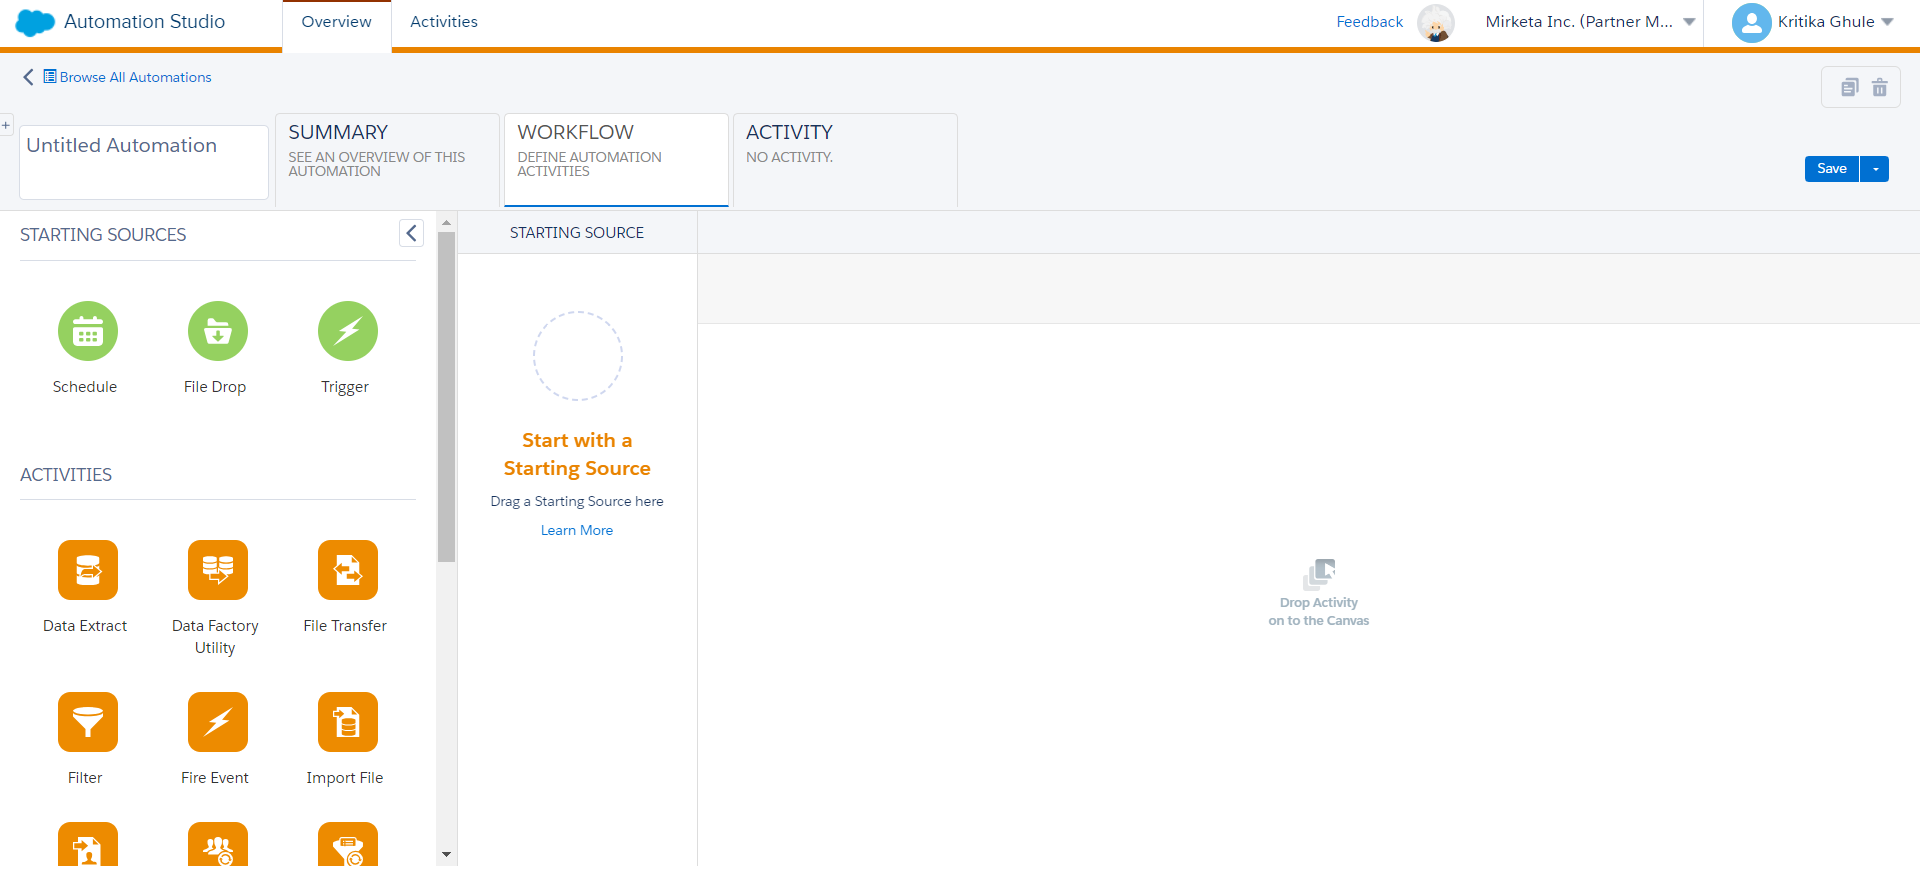
4. Drag and drop activities onto the canvas to build your automation.
5. Connect the activities to create a flow.
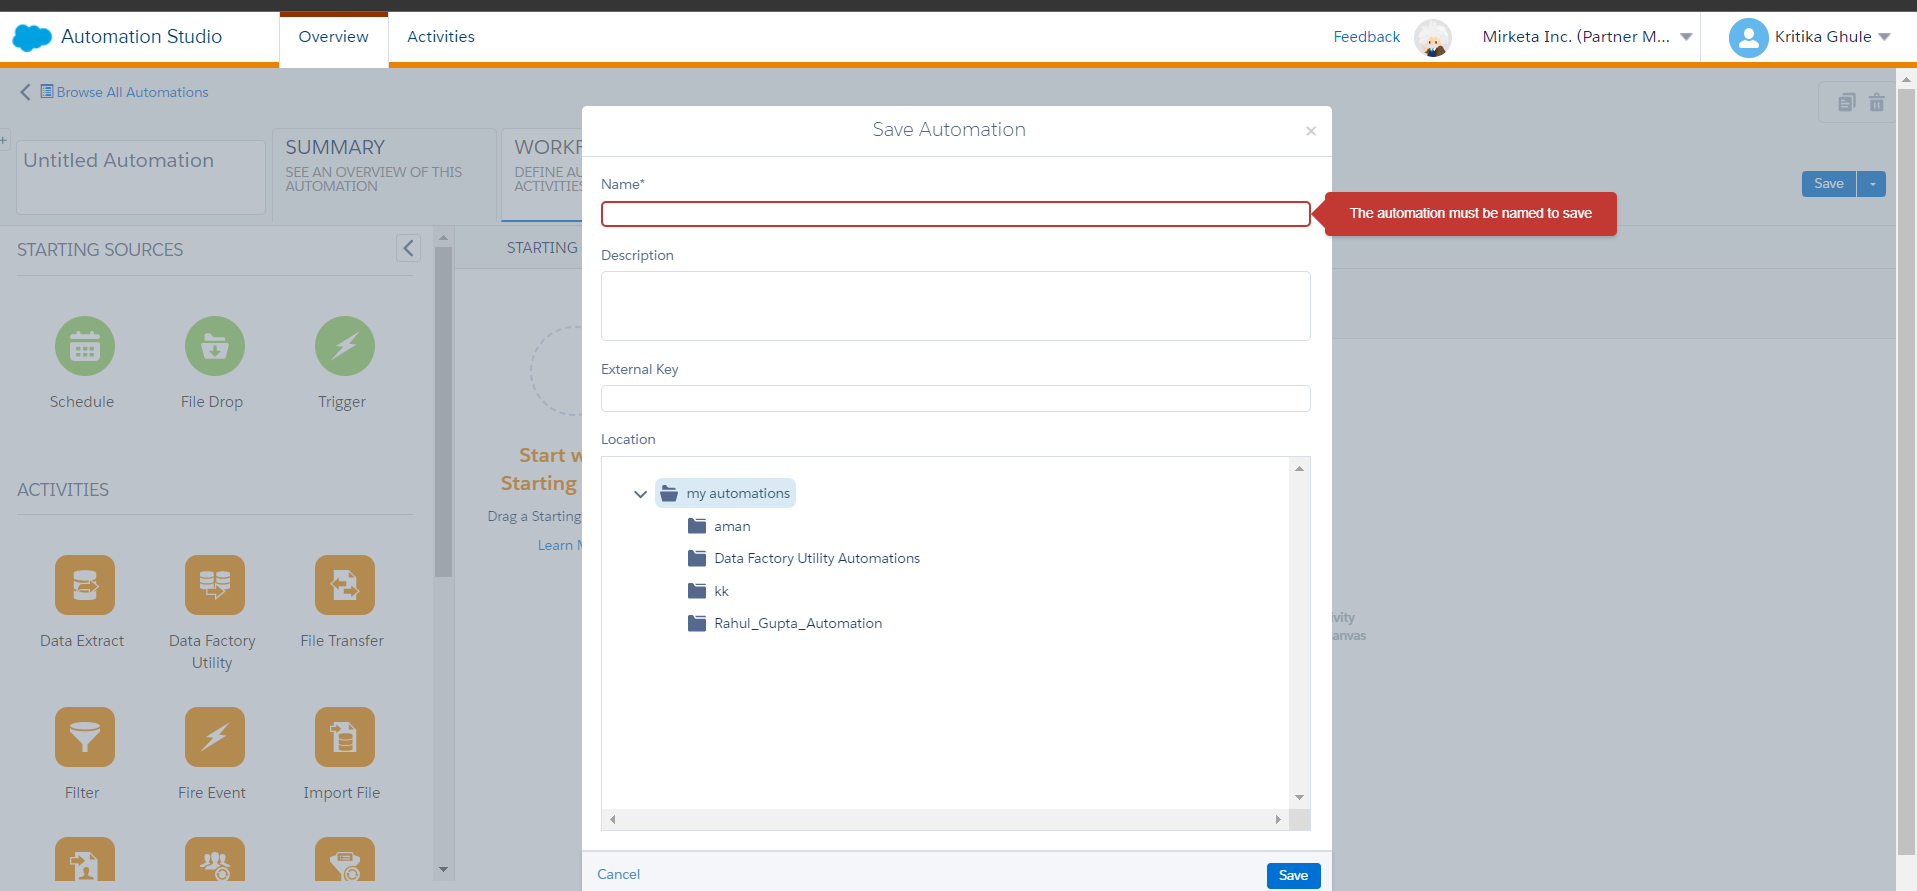
6. Give your automation a name, description and specify folder to save it in and click ‘Save’.
7. Test your automation to ensure it works as expected.
8. Activate your automation.
Keep in mind that the specifics of creating an automation in SFMC can vary depending on the type of automation you want to create and the activities you want to include in your workflow.
SFMC Automation Studio Activities: Activity Tab
The Activities tab is an important component of Automation Studio as it has all the different actions that can be utilized to create custom workflows. Regardless of whether an action is currently being used in automation or not, it can be accessed and managed within the Activities tab.
Automation Studio offers a highly useful feature that enables users to reuse activities in multiple automations. This feature not only saves valuable time but also helps maintain consistency in marketing efforts. Rather than having to create a new activity each time it is required, users can simply select it from the Activities tab and add it to their new automation.
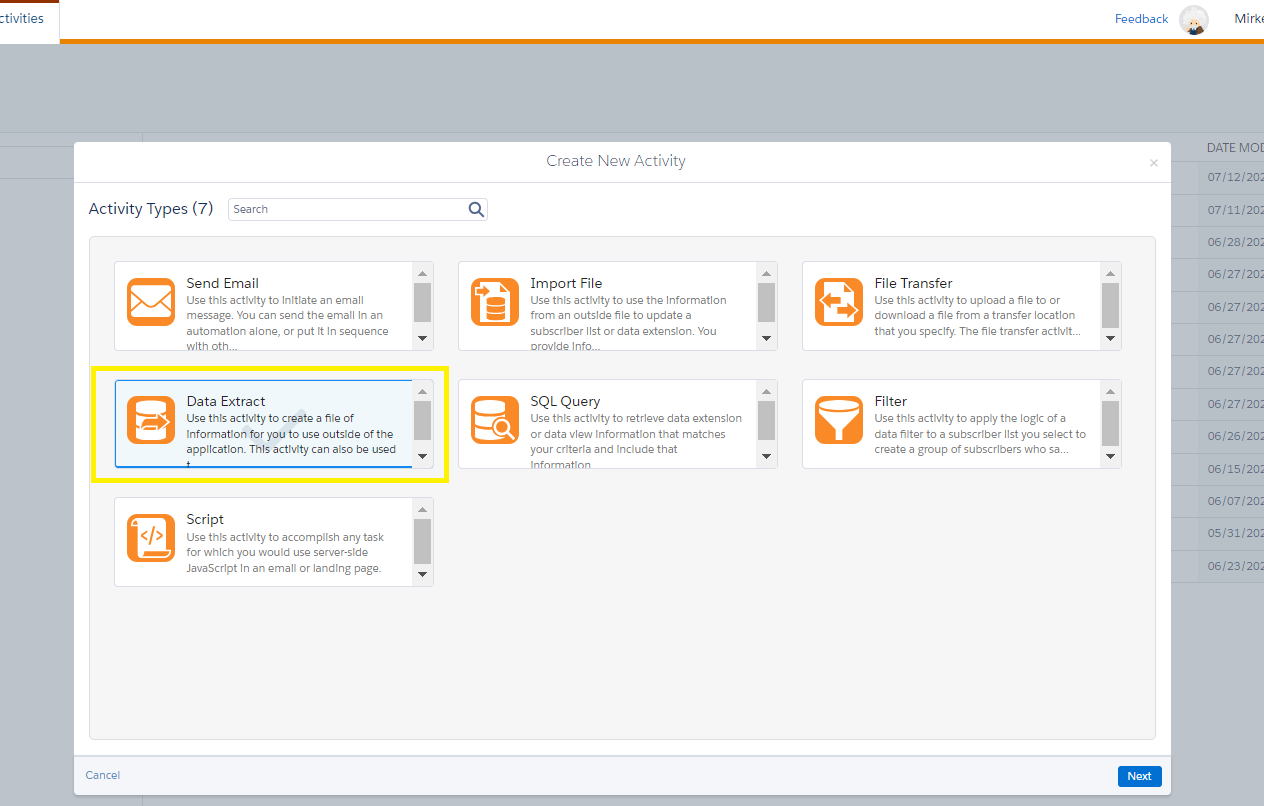
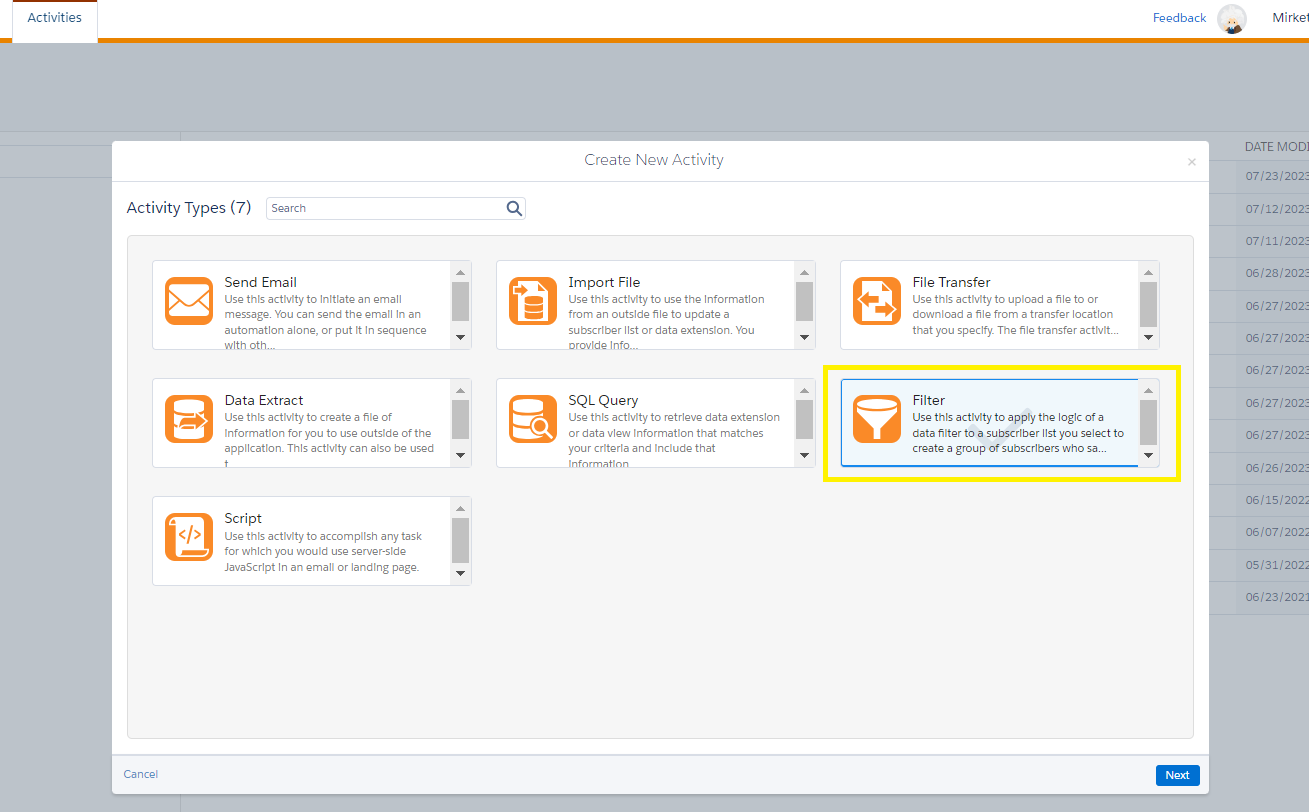
With so many activities at your fingertips, you can create complex workflows that save time and improve efficiency. Here are some of the commonly used SFMC automation studio activities you’ll find in the Automation Studio ‘Activities’ tab.
1. Send Email Activity:
This activity is used within an automation workflow to trigger an email send.
To create an Email Send Activity, follow these steps:
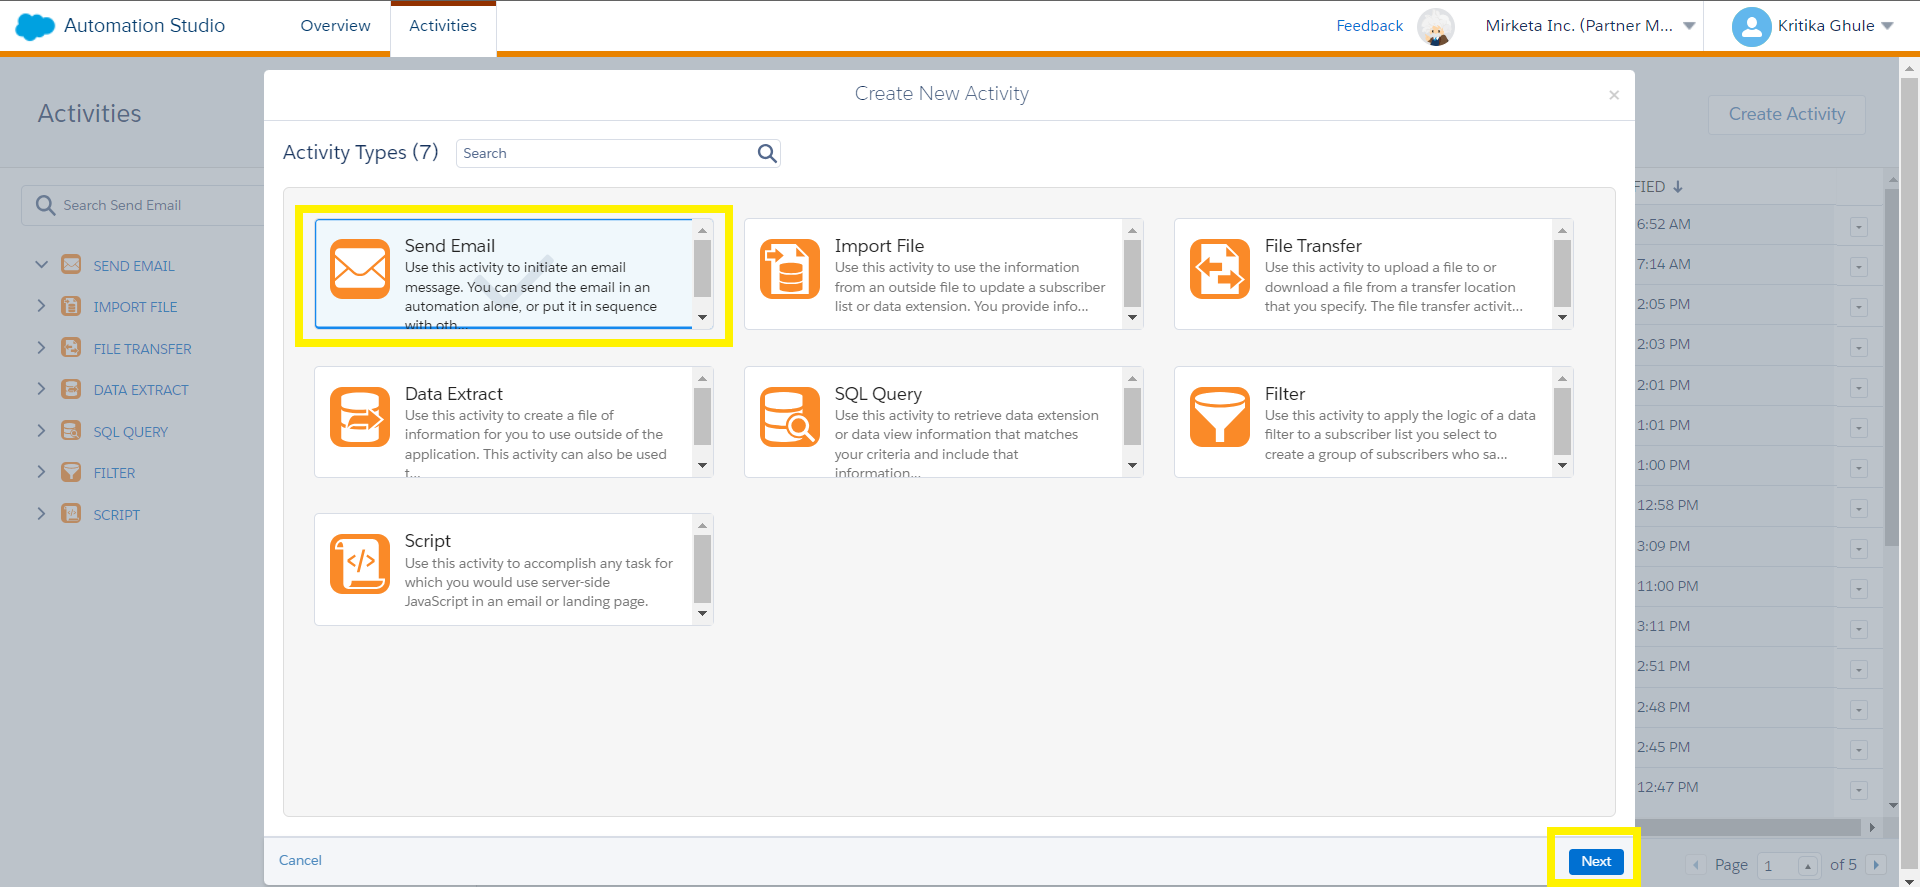
1. Click on the ‘Create Activity’ button in Automation Studio Activities tab.
2. Select the ‘Send Email’ activity and click Next.
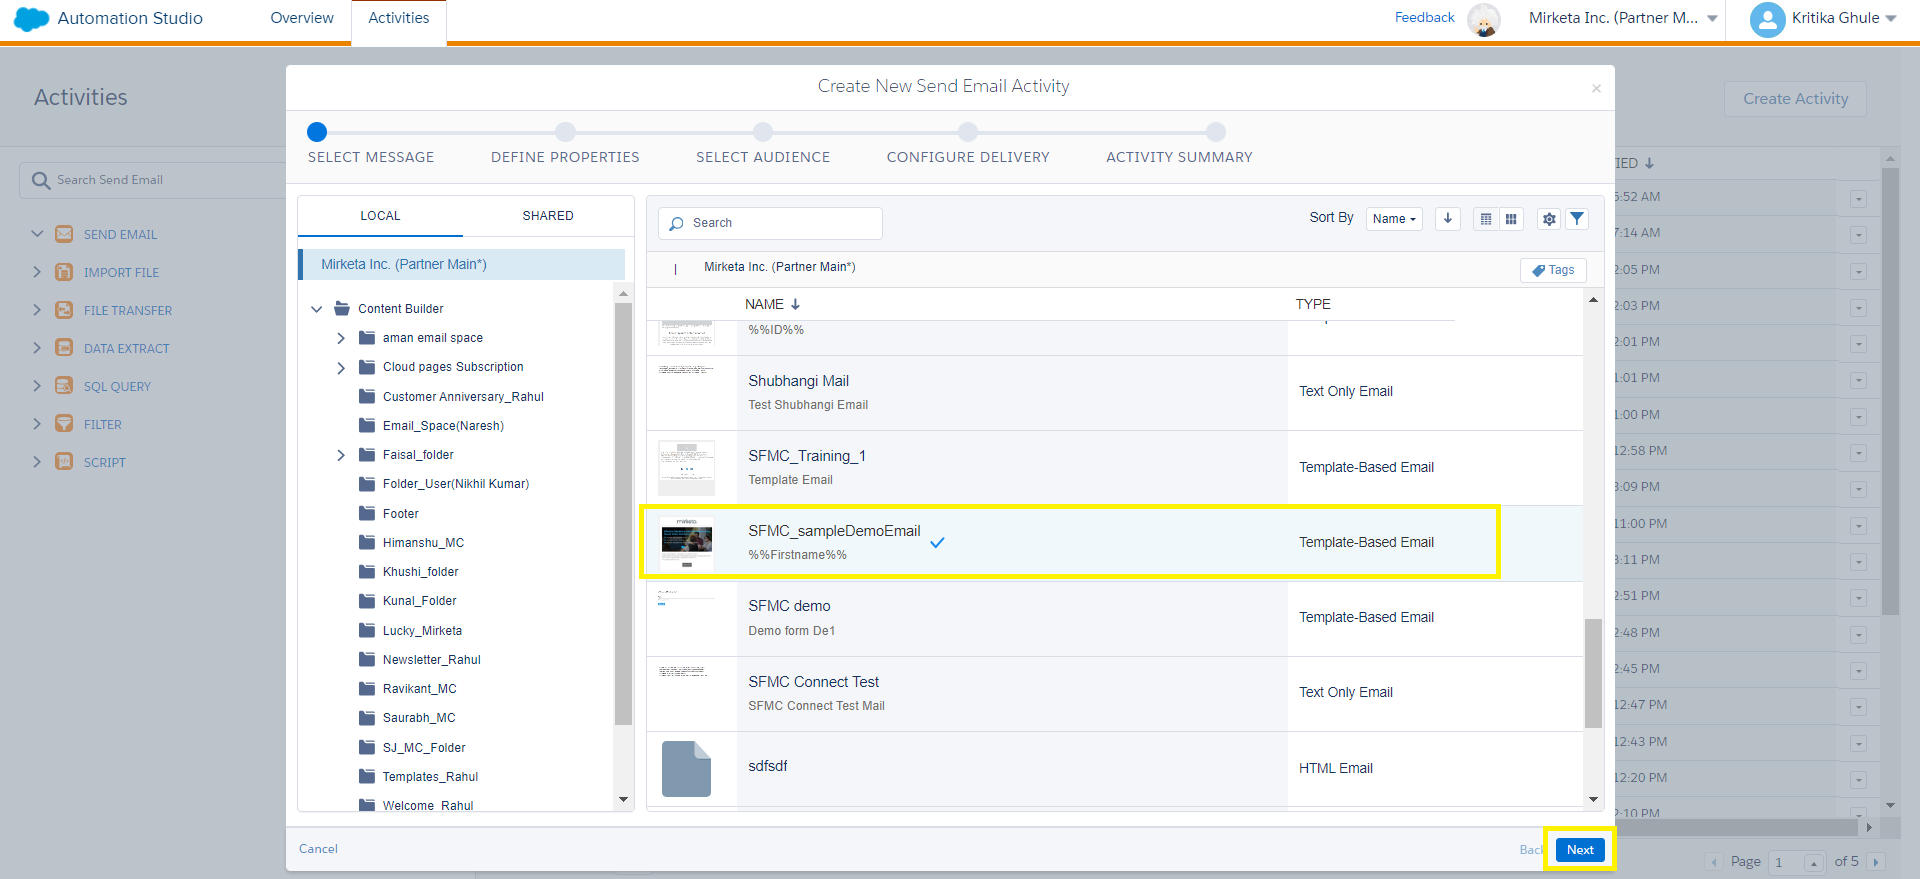
3. Select the message you want to send and click next.
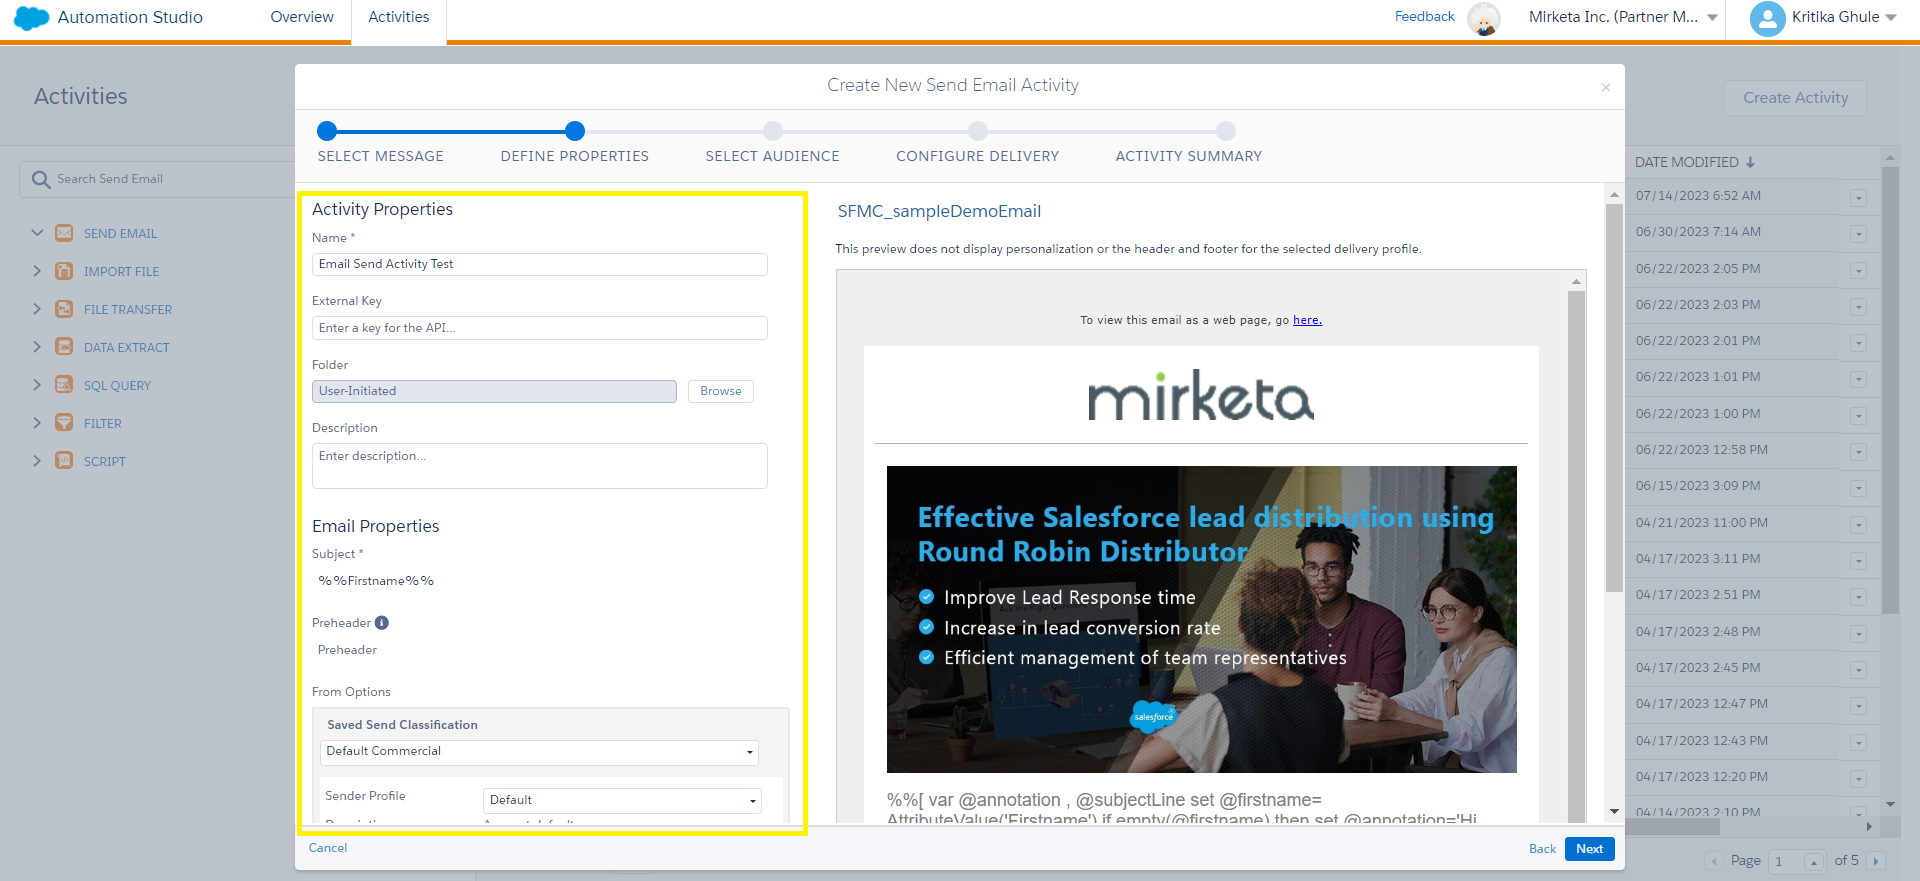
4. Define the Activity Properties like name, description, and email properties like subject, preheader, sender and delivery profile and click next.
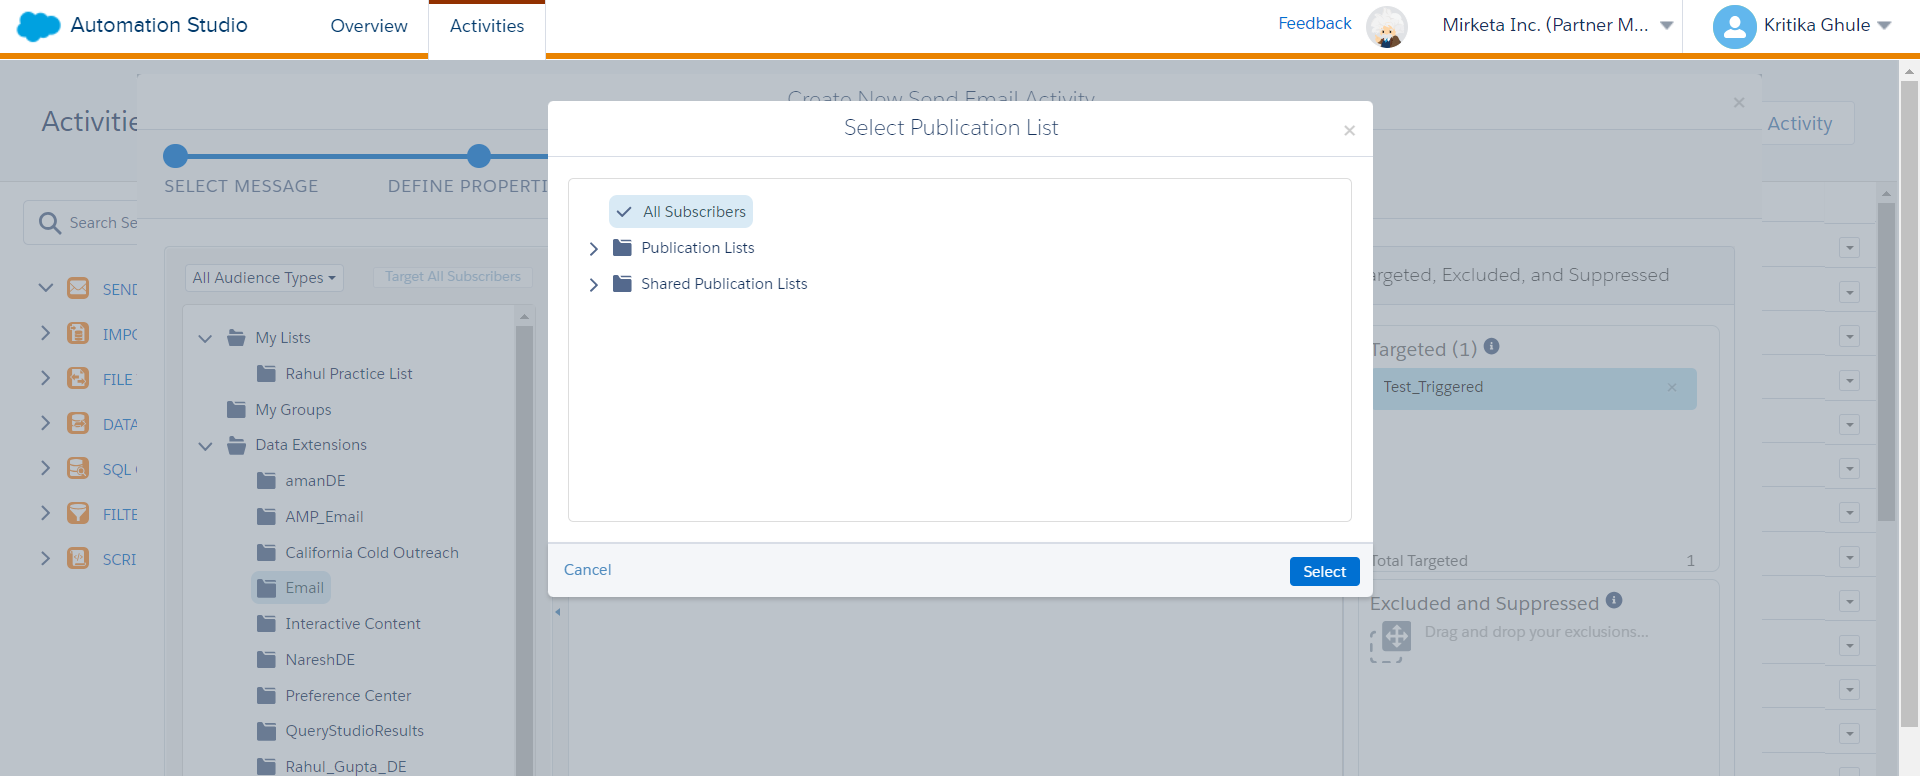
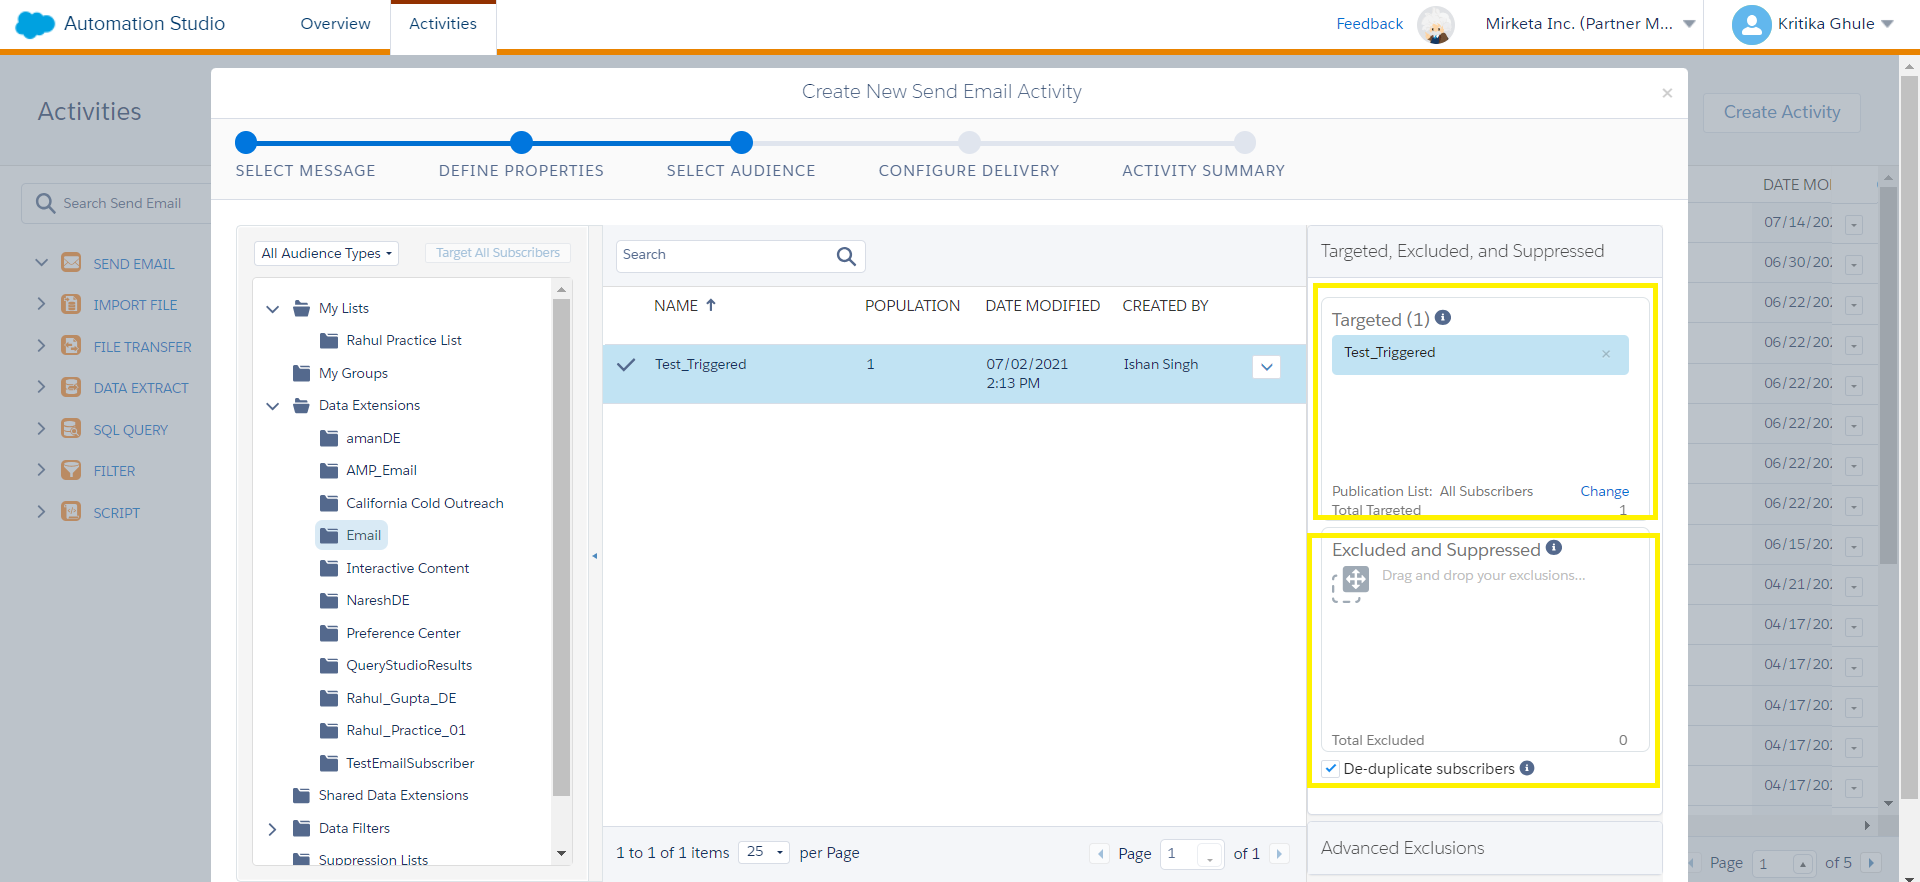
5. From the left side panel search and select the target audience (list, group, data extension, etc.) for this email, drag and drop it in the targeted section. From the pop-up select publication list.
If you want, you can include a source in excluded and suppressed section.
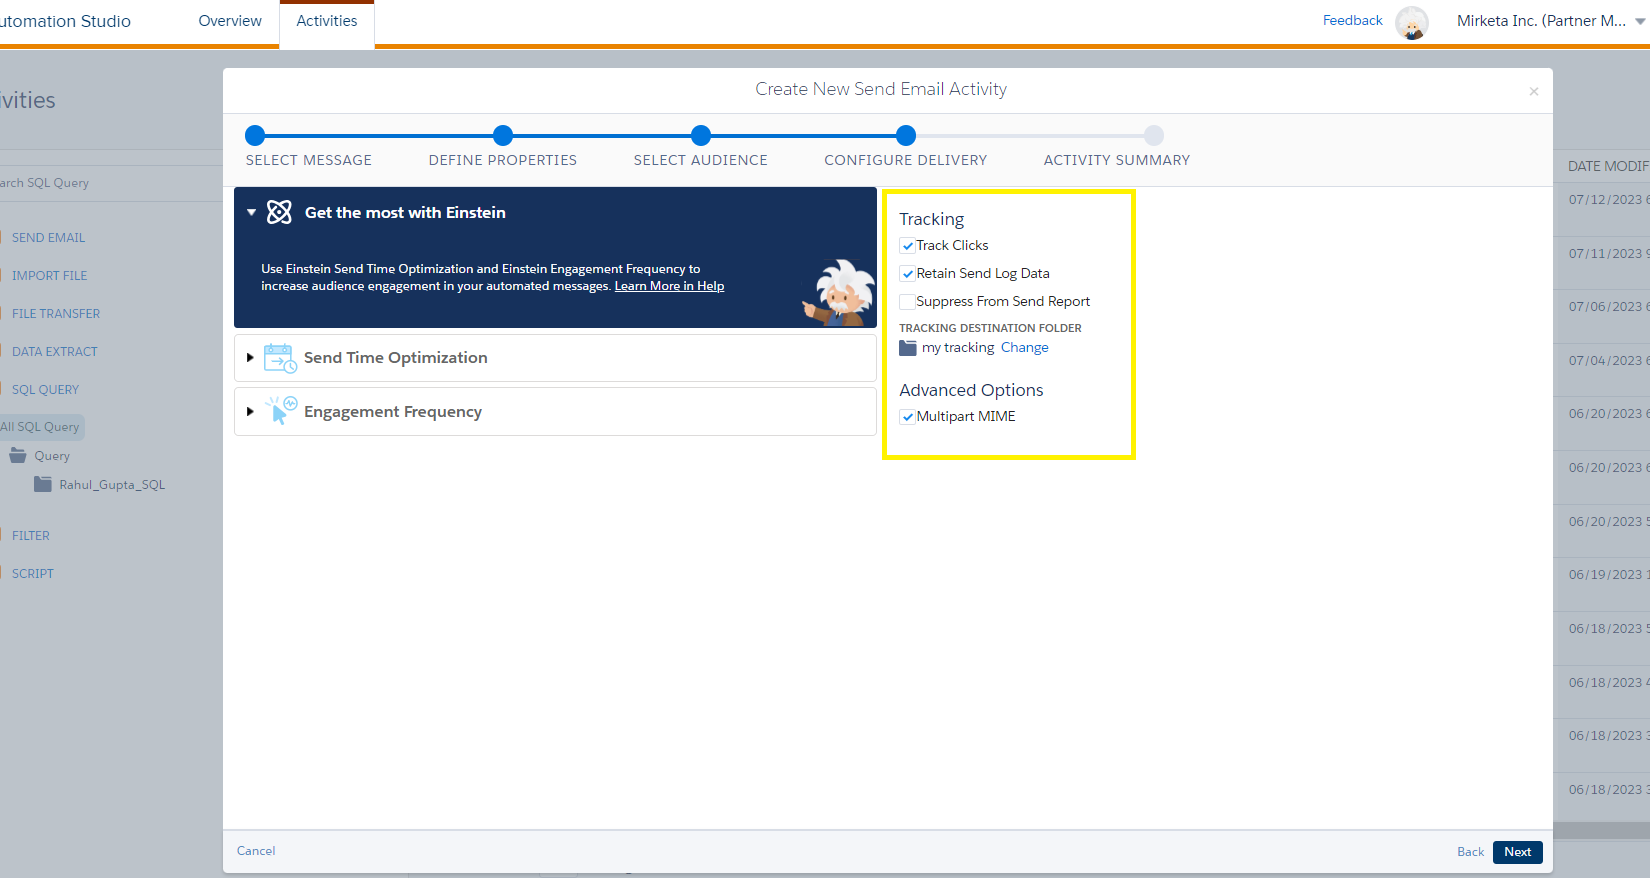
6. Configure delivery settings and click next.
7. Check everything in the summary and if everything is correct check the checkbox ‘This information is correct and this email is ready to send’ and click Finish button.
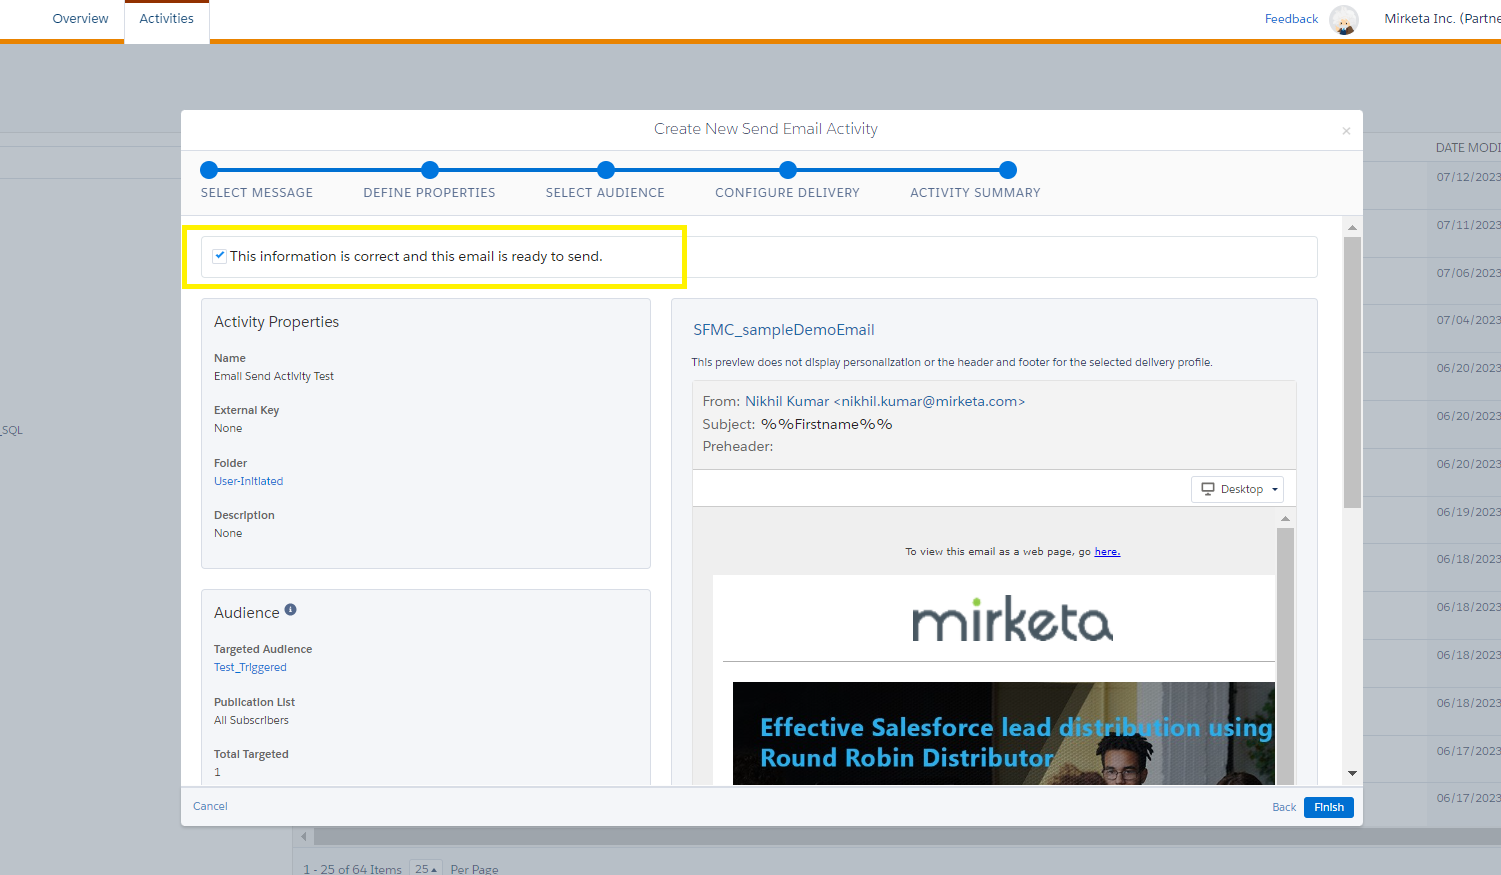
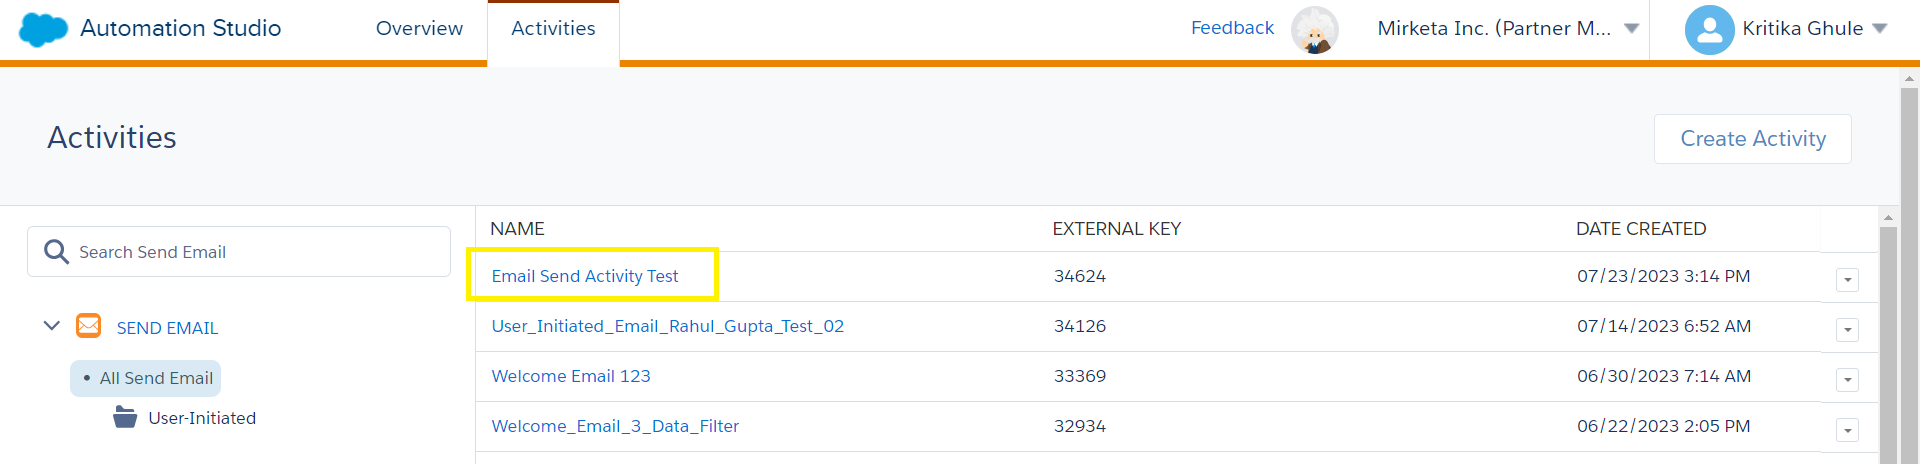
Your Email Send activity will then be created and ready to use in automation. You can find your activity in Activity tab -> SEND EMAIL->All Send Email list.
2. Import File Activity:
The Import File activity allows users to easily import data from a file into a data extension, which can then be used for various marketing purposes such as updating customer data, email sends, journey builder, and more.
To create an Import File Activity, follow these steps:
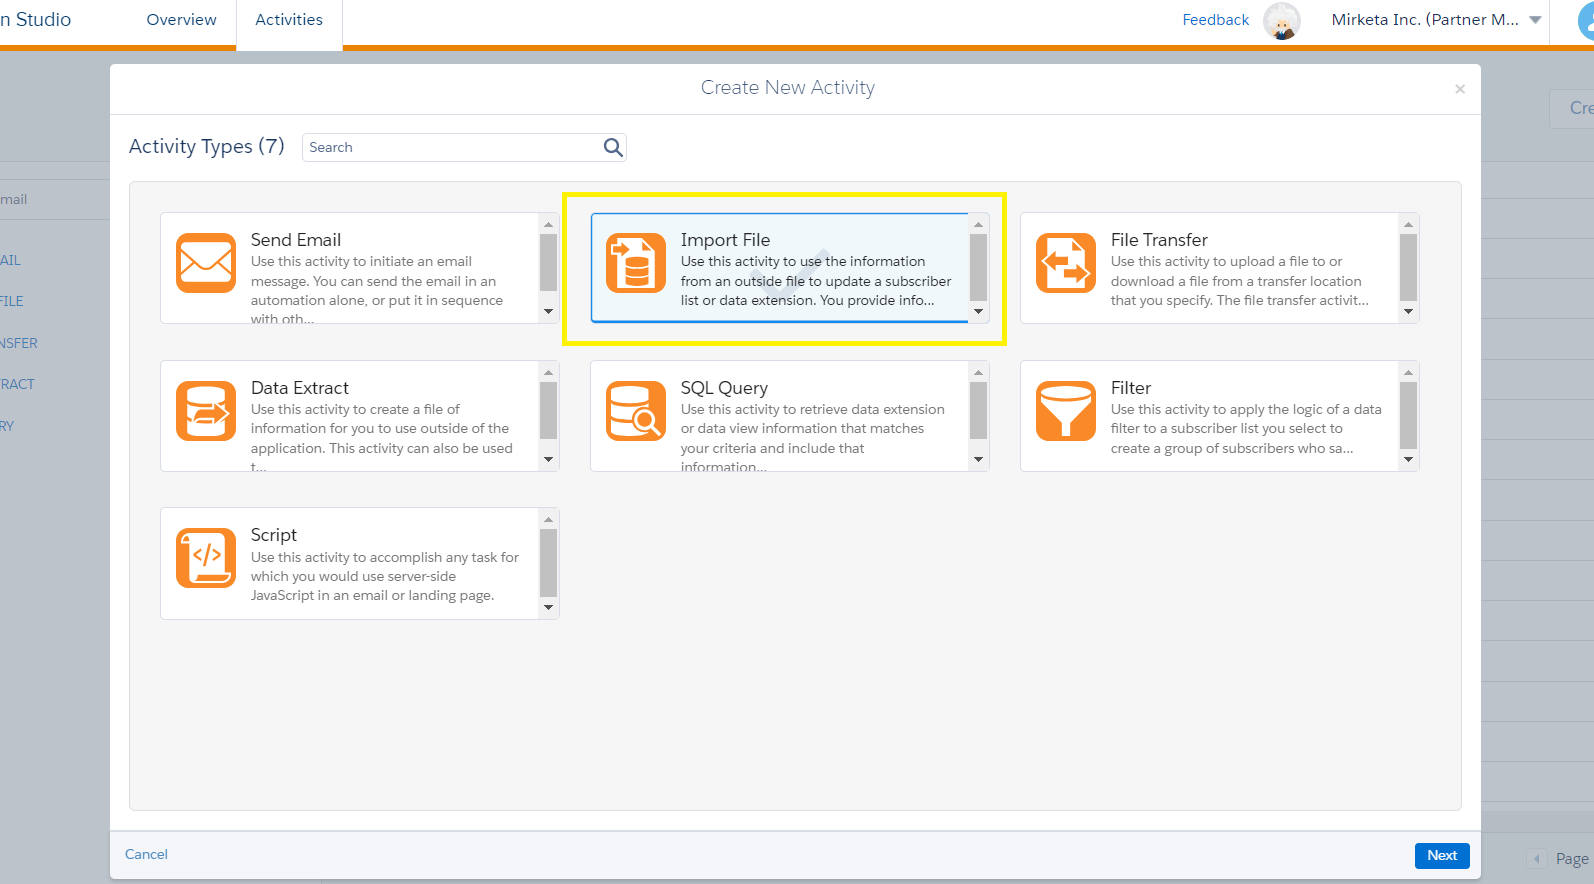
1. Click on the ‘Create Activity’ button in the Automation Studio Activities tab.
2. Select the ‘Import File’ activity and click Next.
3. Fill in the Activity info details and click next.

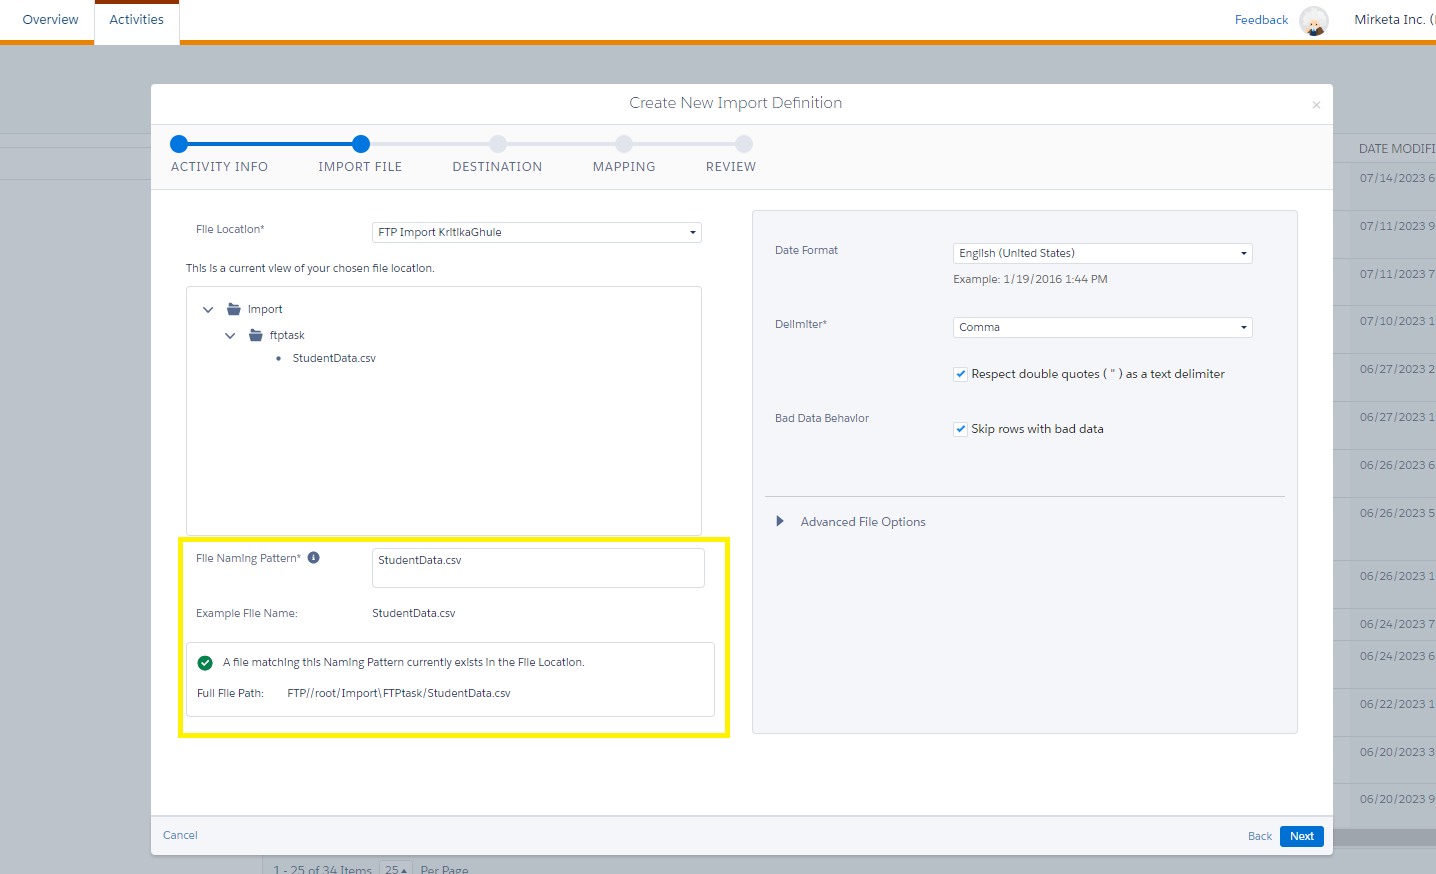
4. Select the import file location and input file naming pattern (Make sure it is exact same as file name) and click next.
5. Select the destination data extension and click next.
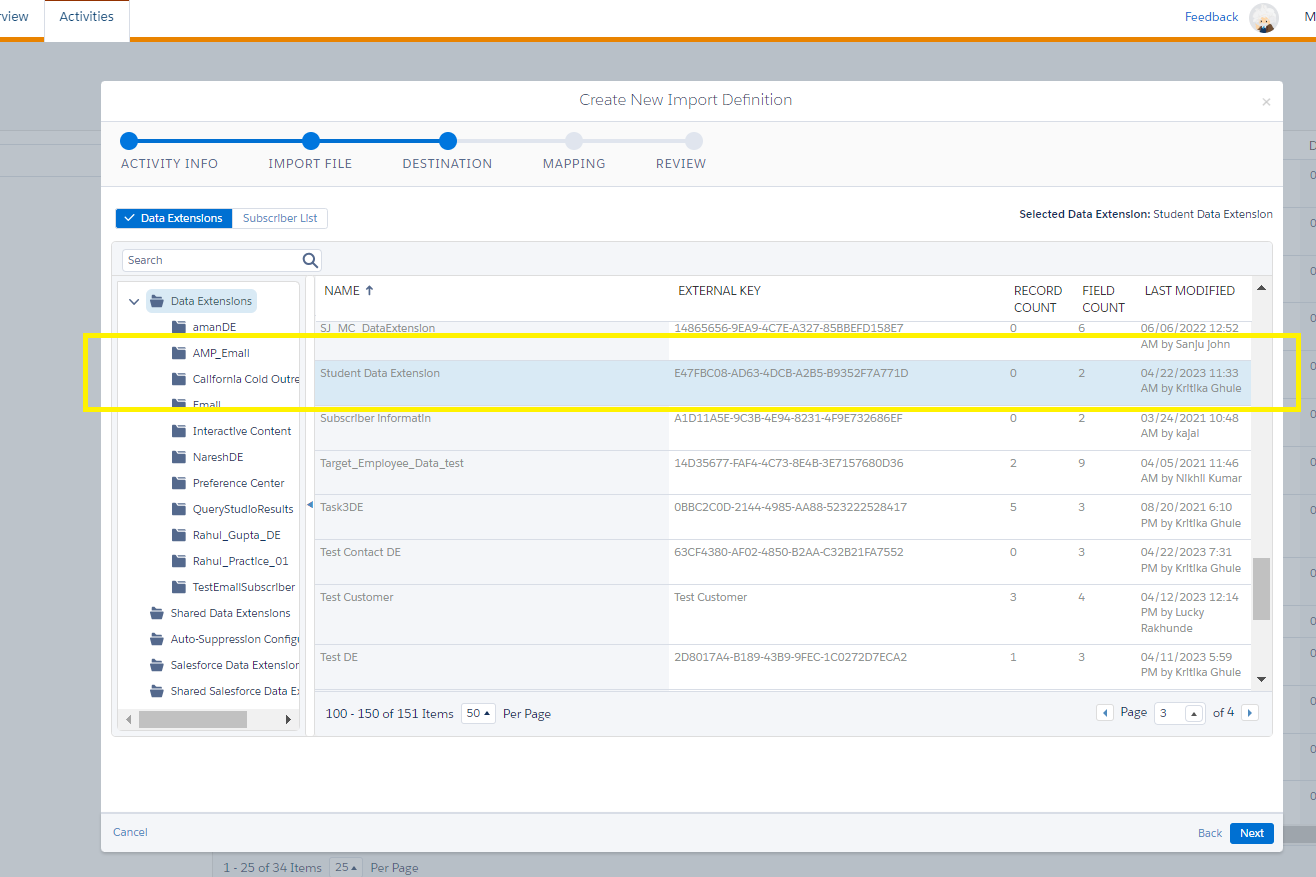
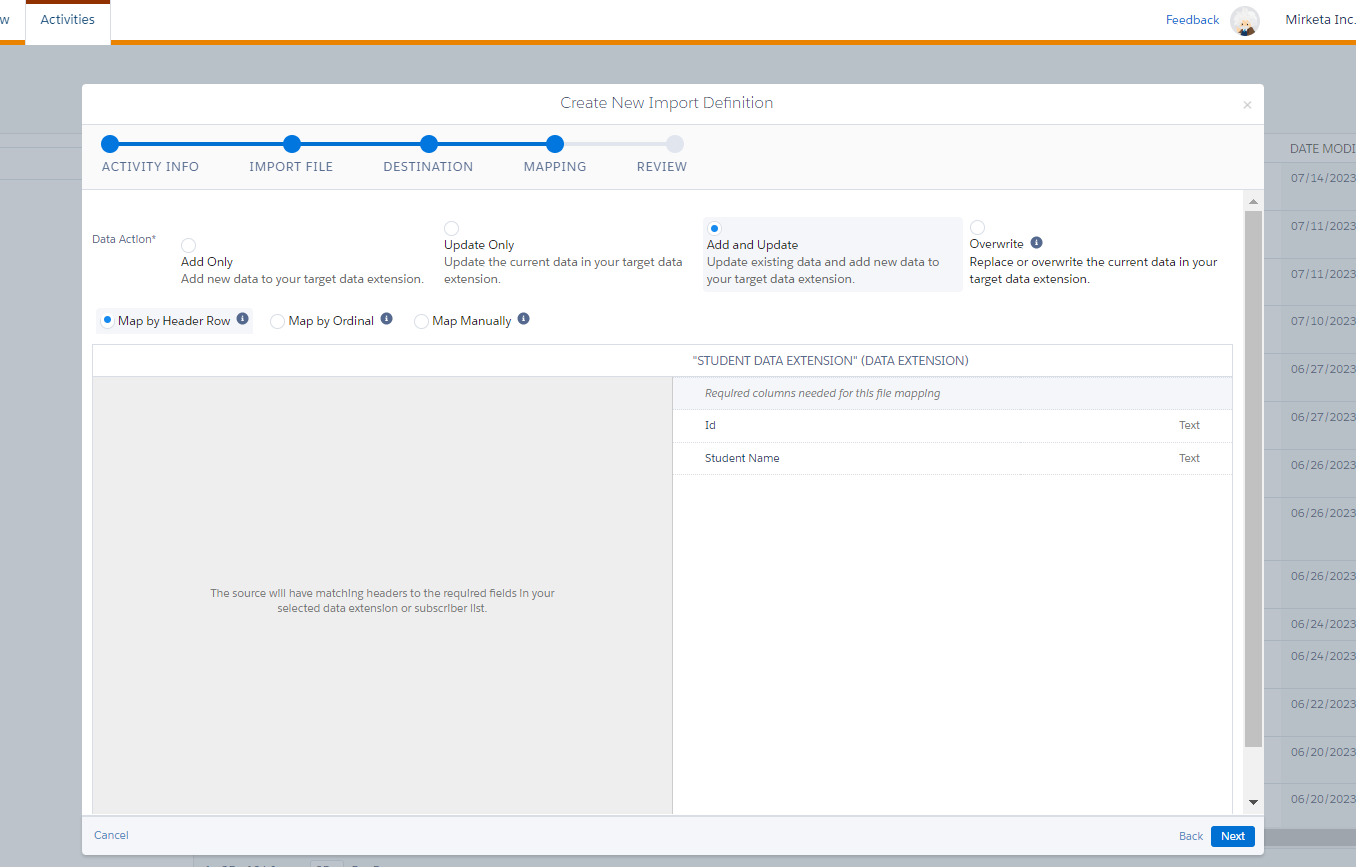
6. In mapping, select the data action and mapping style and click next.
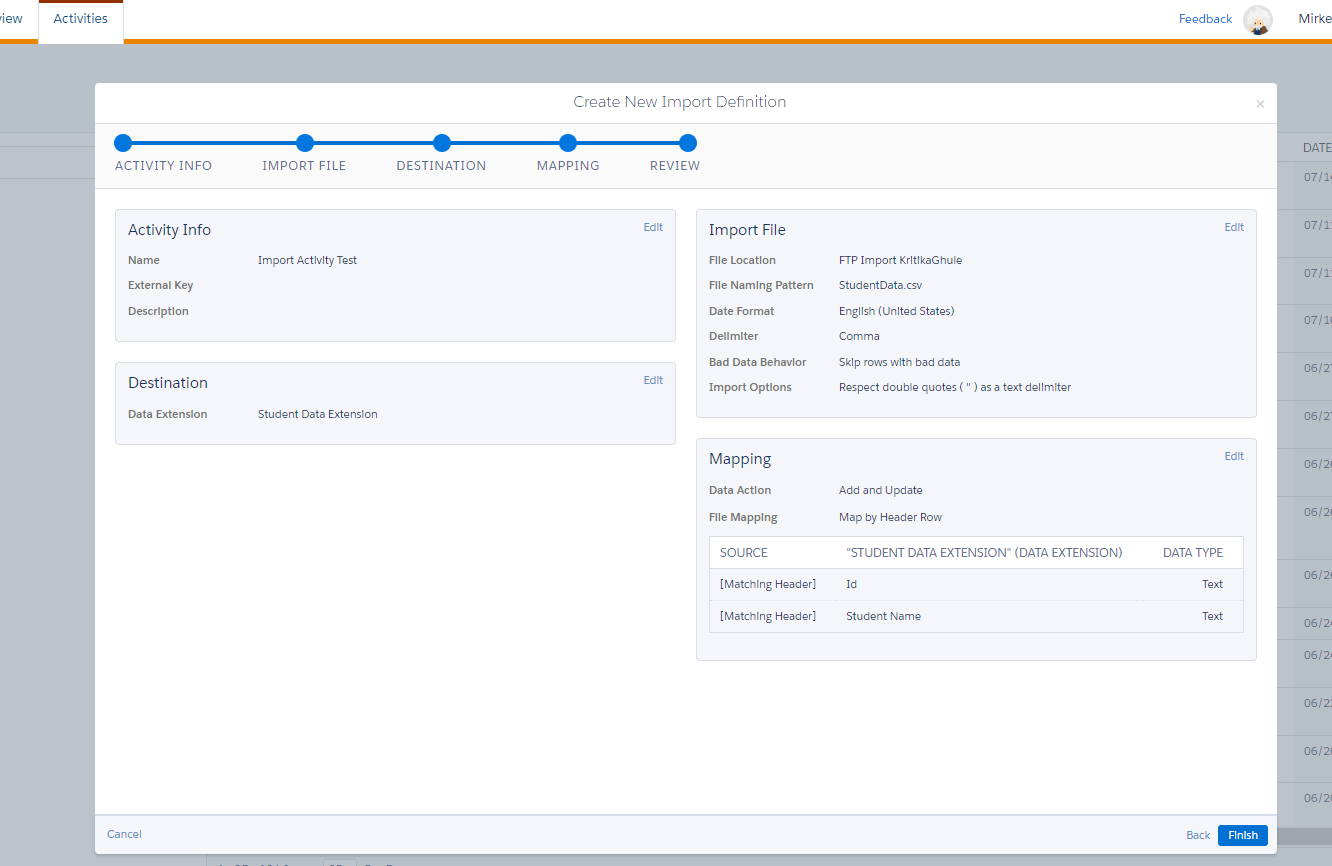
7. Review the summary in the review section and click finish. Now the import activity got created and you can use this in any automation.

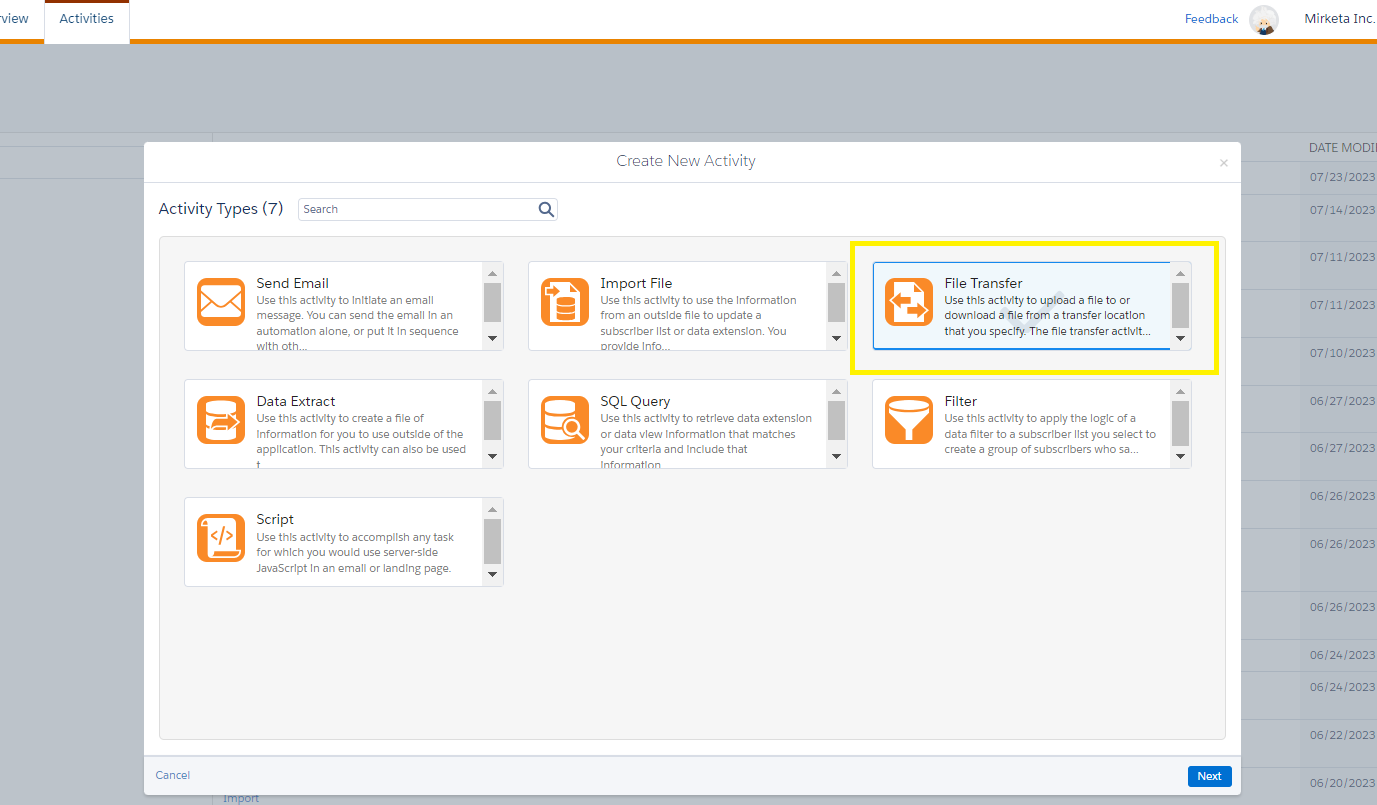
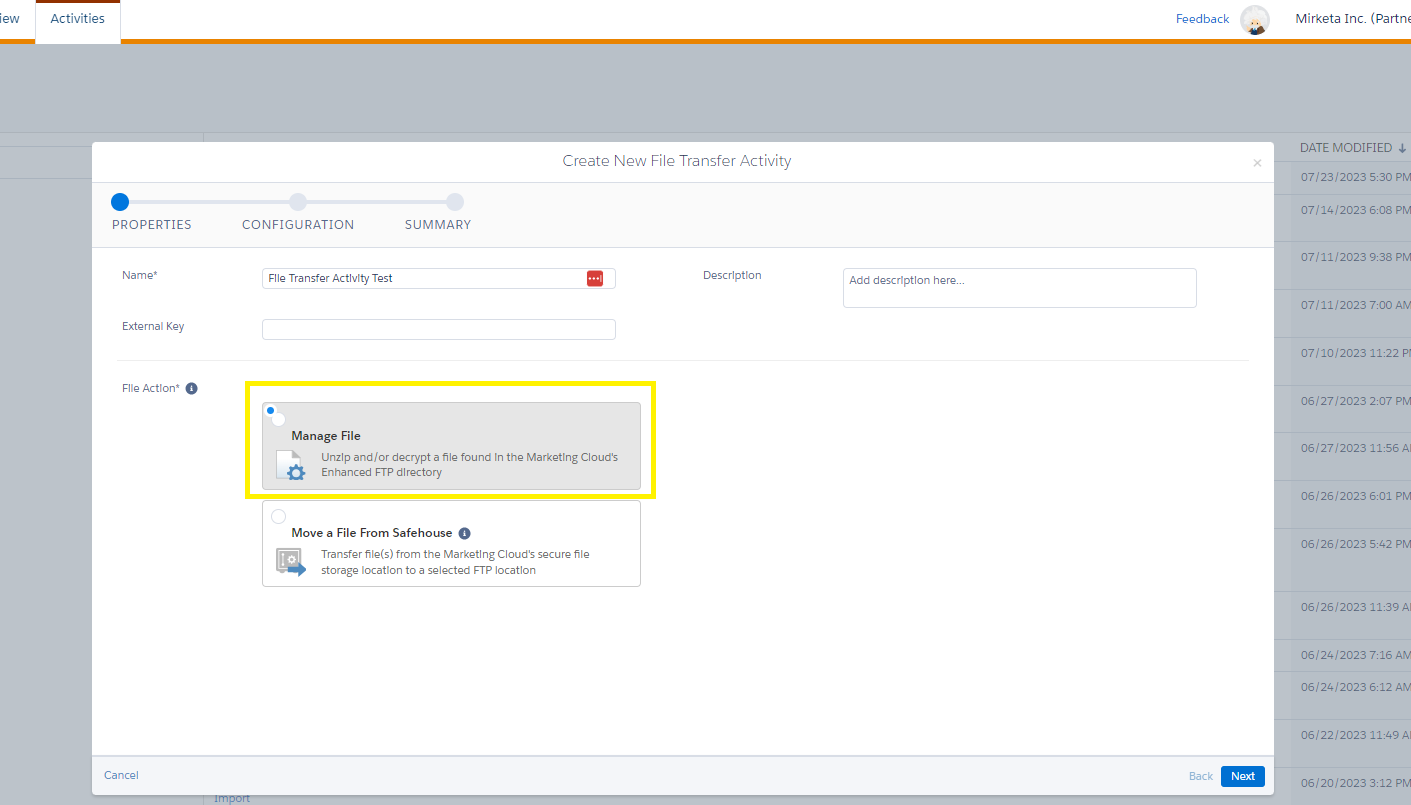
3. File Transfer Activity:
The File Transfer activity enables the user to transfer files between different locations, including from a Marketing Cloud FTP server to an external FTP server, and vice versa. This capability is especially beneficial when dealing with large volumes of data since it allows for the automation of file transfers between systems.
To create a File Transfer Activity, follow these steps:
1. Click on the ‘Create Activity’ button in the Automation Studio Activities tab.
2. Select the ‘File Transfer’ activity and click Next.
The File Transfer activity in Salesforce Marketing Cloud has two file actions:
(i). Manage File: This action allows you to perform various file management tasks, such as deleting, moving, or renaming files.
– After following above steps, fill in the name, description and select file action ‘Manage File’ then click next.
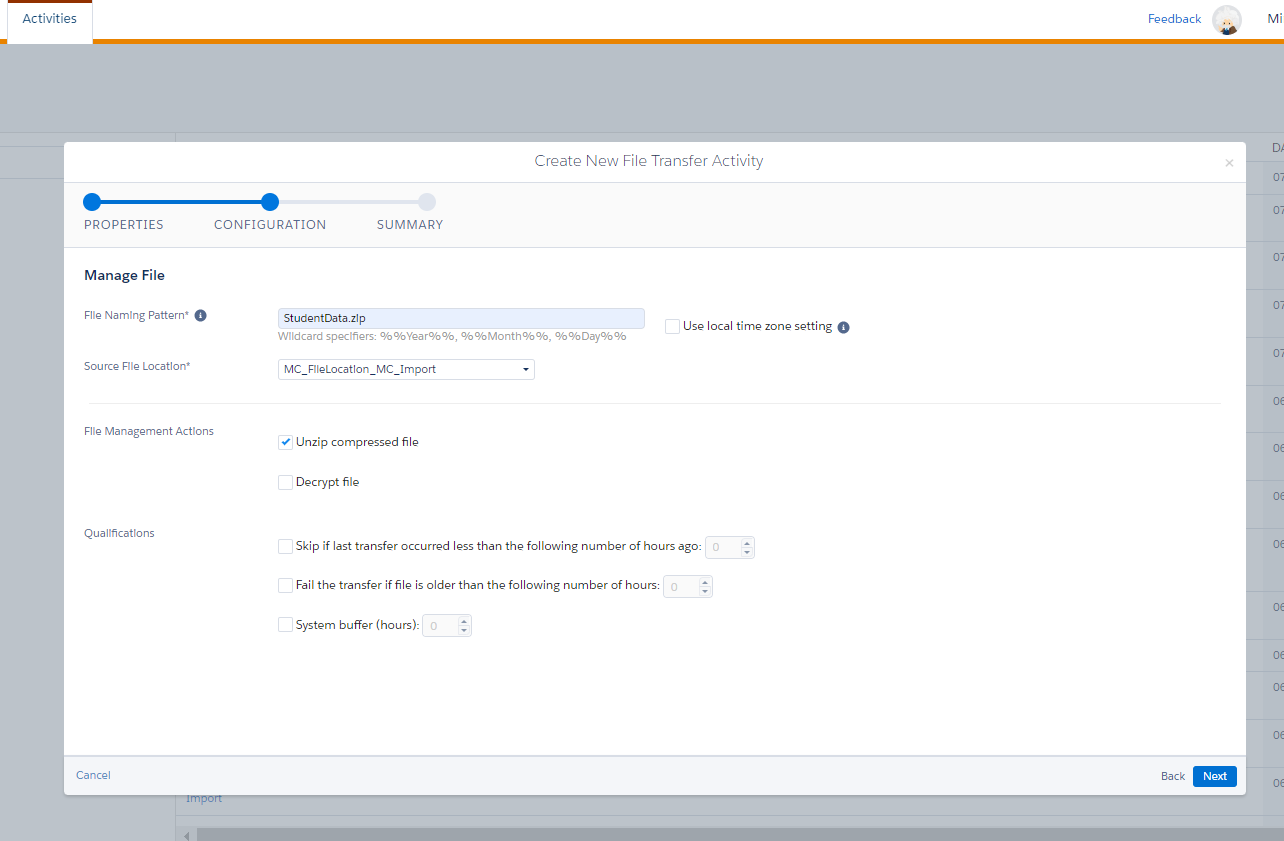
– Set the fields on configuration section:
File Naming Pattern: This is what your file naming pattern is on your FTP or what you want to name your file when you put it on your FTP.
You can use wildcard specifiers (%%Year%%, %%Month%%, %%Day%%, %%Hour%%, %%Minute%%, %%Second%%) for personalised file naming.
Use local time zone setting checkbox when you put wildcard specifiers.
Choose Source File Location, File Management Actions, and Qualifications as preferred.
Click next then.
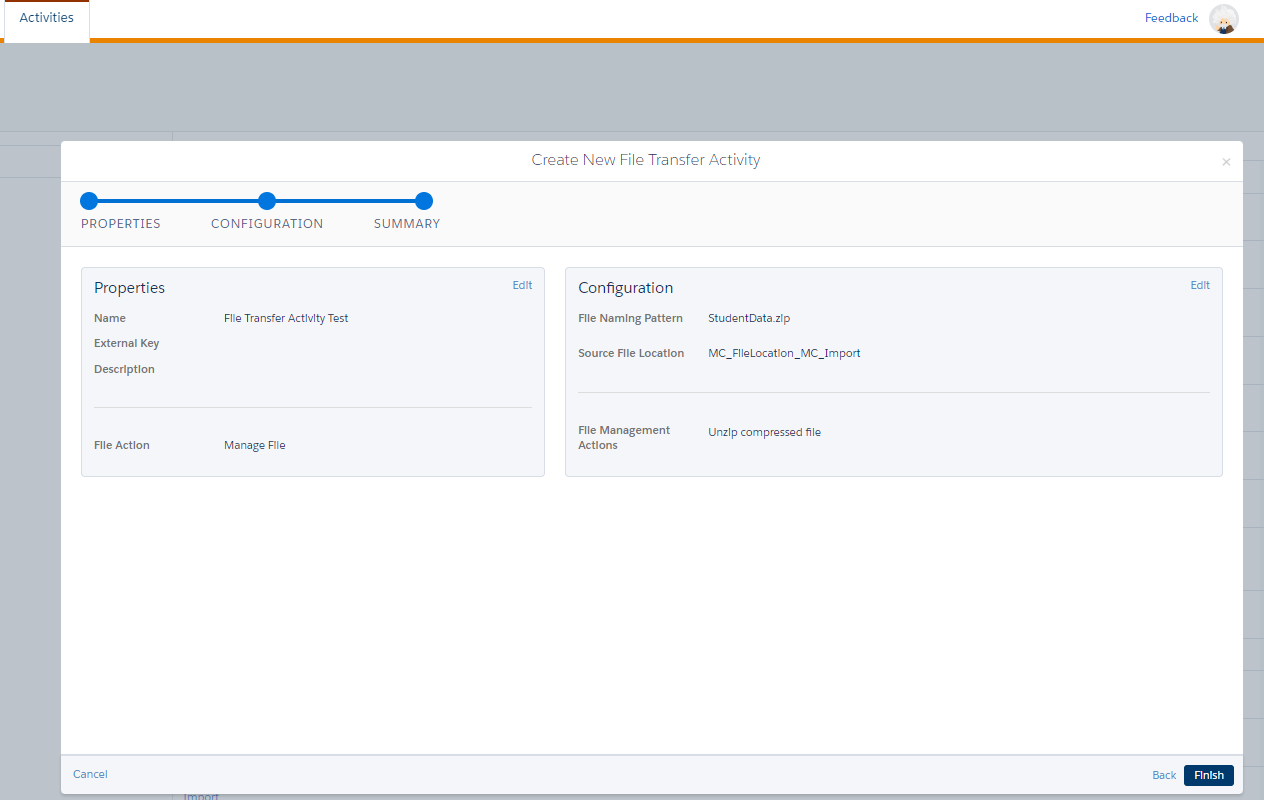
Review the summary and click Finish. Your activity is created.
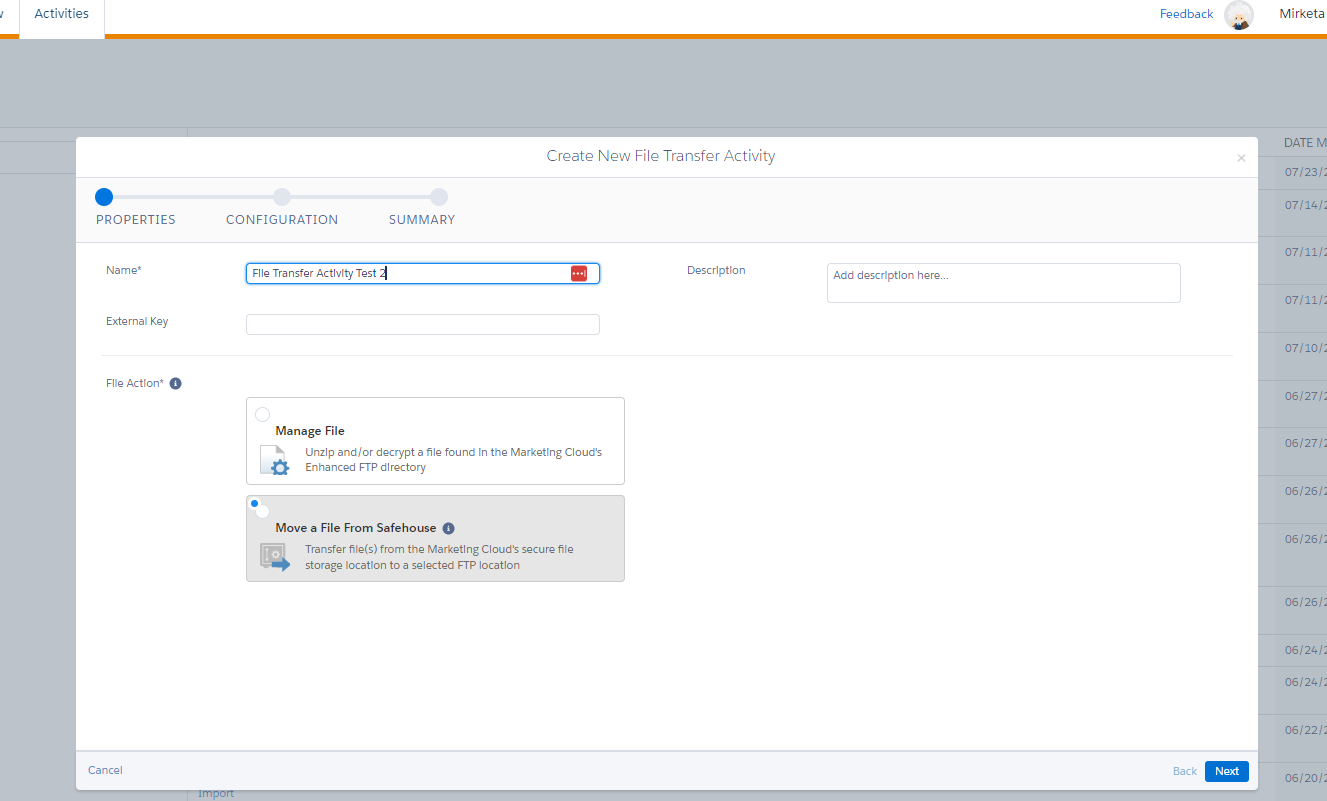
(ii). Move a file from Safehouse:
This action is designed to relocate files from the Safehouse to another location, such as an FTP server. The Safehouse serves as a temporary repository for files that are uploaded to Marketing Cloud via APIs, the Marketing Cloud Connector, or the Marketing Cloud Web Application. Once files are stored in the Safehouse, they can be processed and transferred to their destination using the File Transfer activity. This action is especially beneficial when working with files that are uploaded to Marketing Cloud programmatically or require processing before being transferred to their intended destination.
– After following the above steps, fill in the name, description and select file action ‘Move a File From Safehouse’ then click next.
Configure the file transfer activity
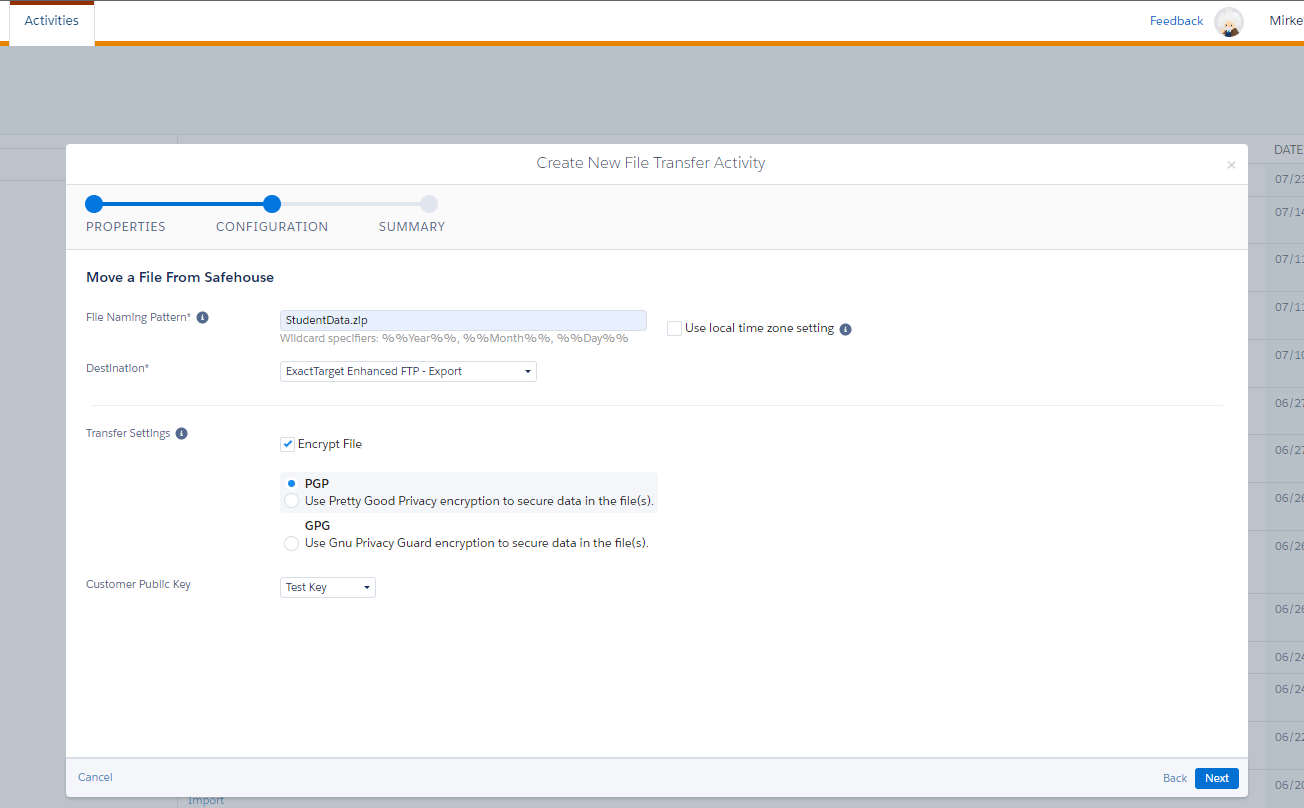
Select transfer setting and select customer public key created in Key Management and click next.
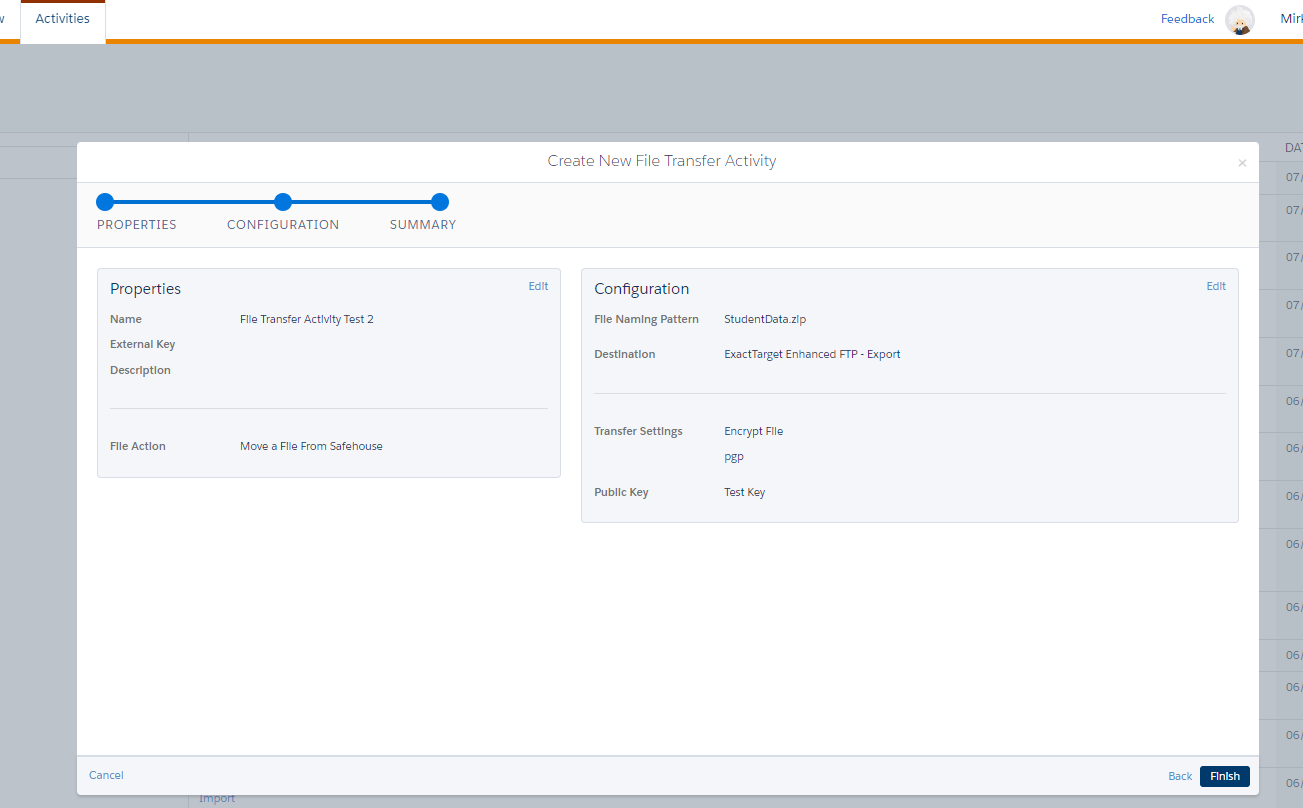
Review the summary and then click finish. The file transfer activity will be created and ready to use in an automation.
4. Data Extract Activity:
The Data Extract activity allows you to extract data from your Marketing Cloud account and save it to a file on the SFMC FTP server or on an external FTP server.
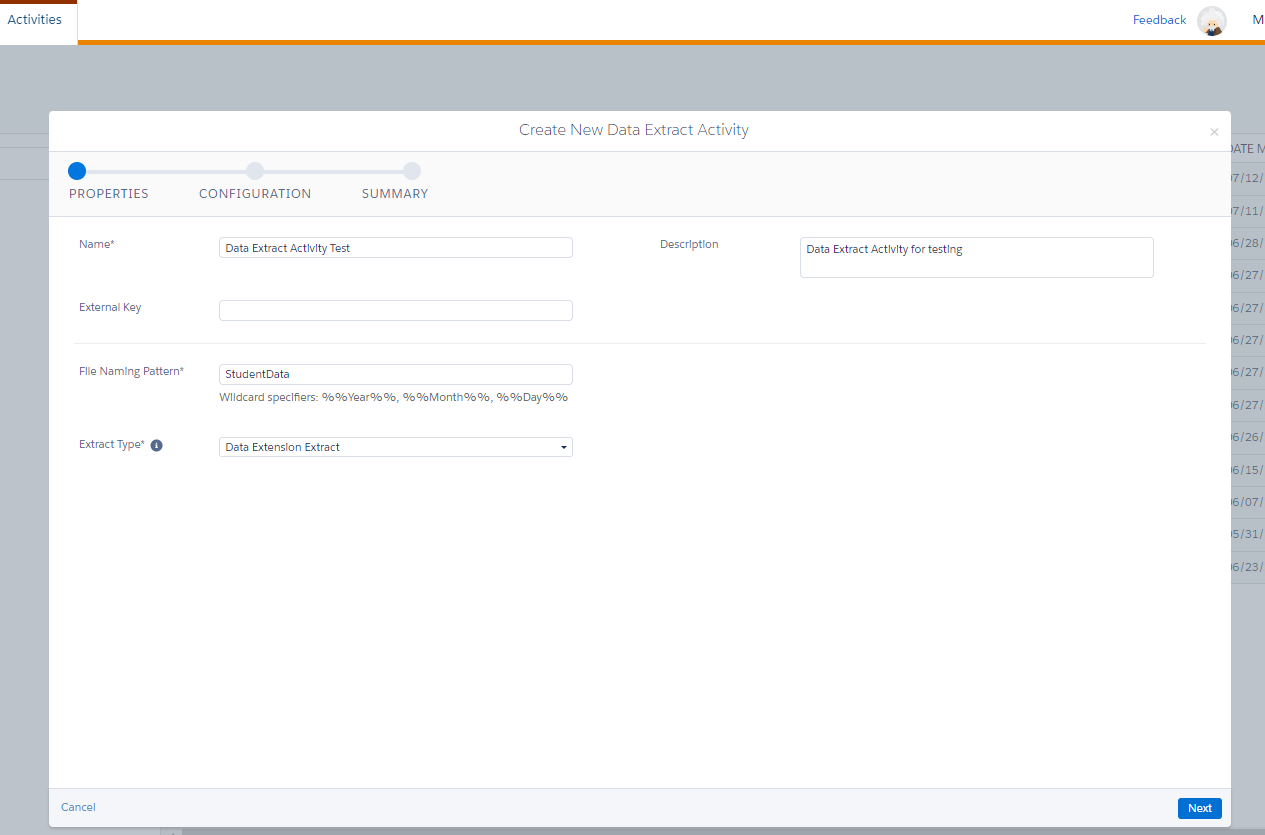
Create a Data Extract activity following these steps:
1. Click on the ‘Create Activity’ button in the Automation Studio Activities tab.
2. Select the ‘Data Extract’ activity and click Next.
3. Fill in the activity properties. You can select among various extract types; in this case we are using data extension and click next.
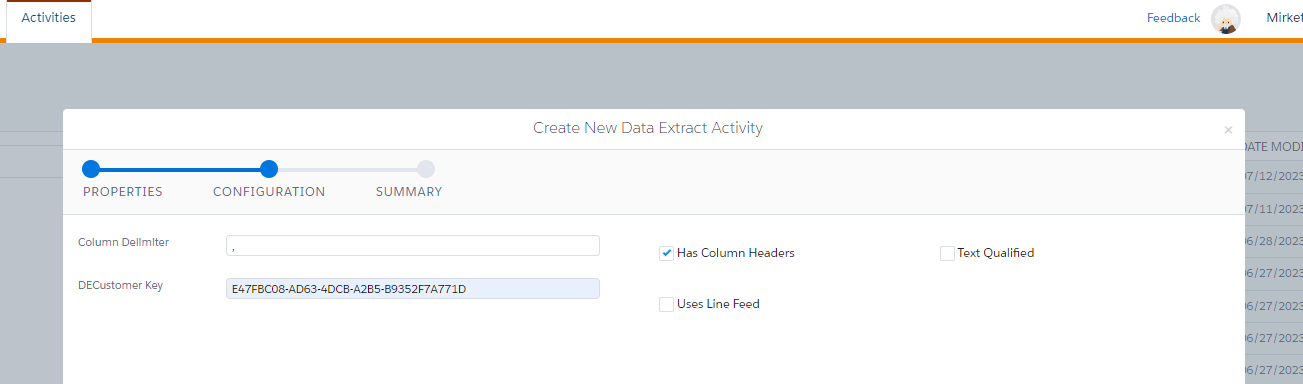
4. Complete rest of the configuration: add column delimiter, DECustomer Key, and other specifications and click next.
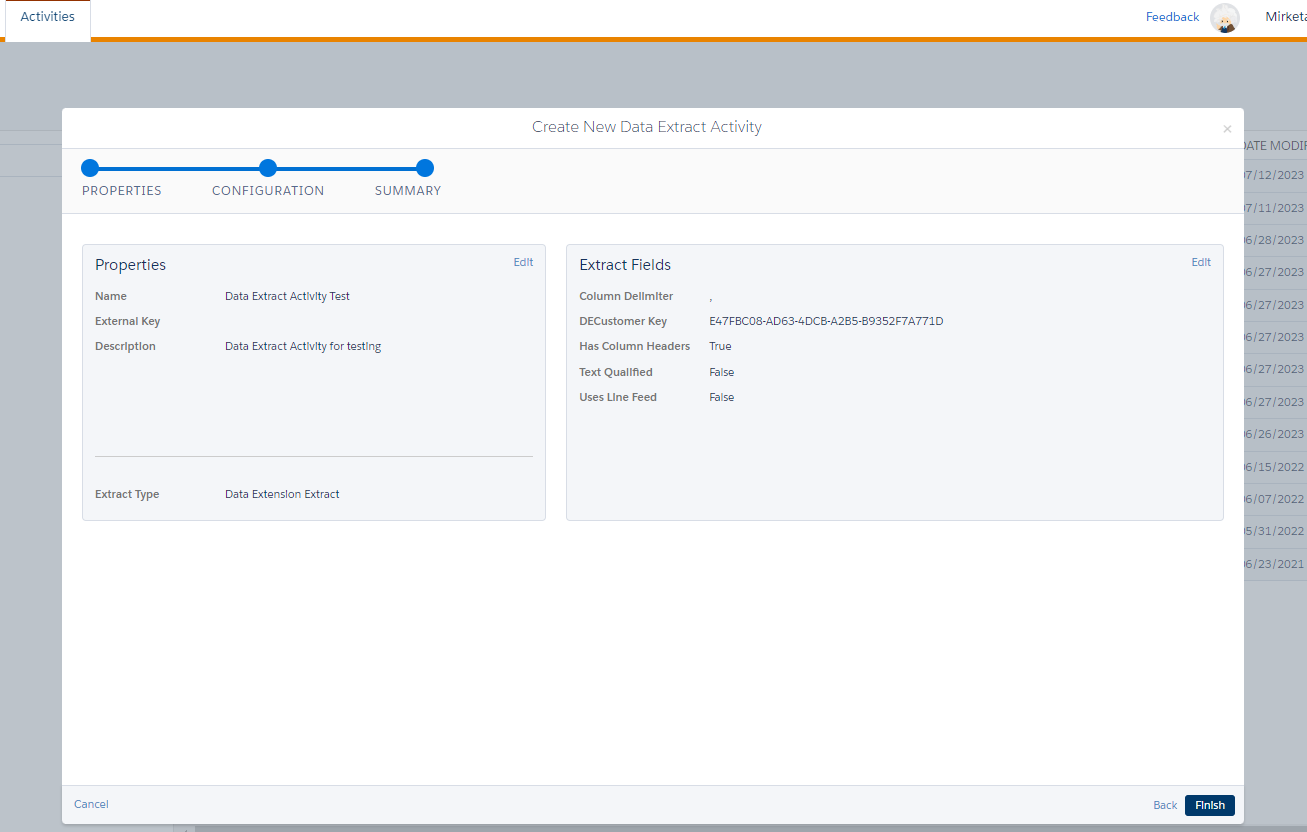
5. Review summary details and click finish.
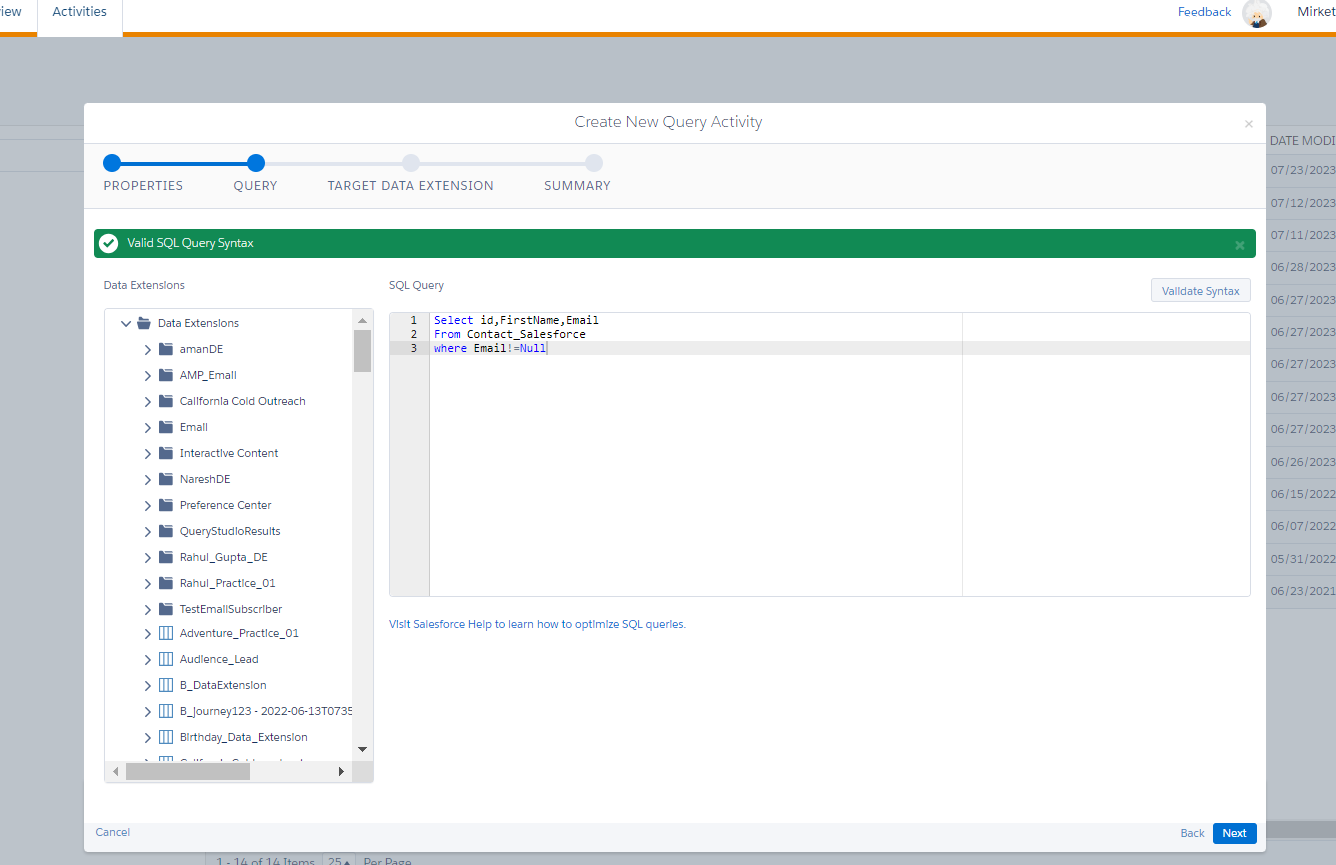
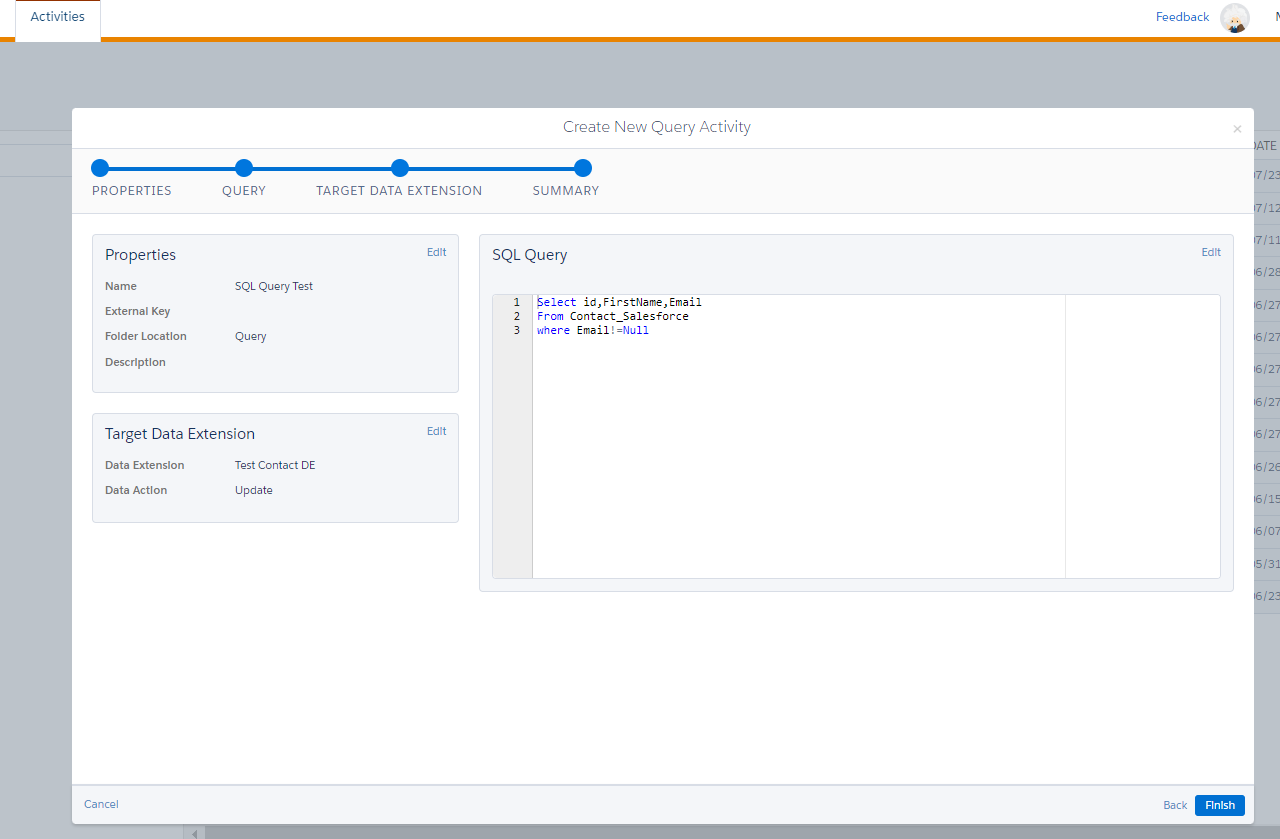
5. SQL Query Activity:
SQL query activity is a feature that is used to create SQL (Structured Query Language) queries to retrieve data from a data extension or another data source within SFMC.
When creating an SQL query activity in SFMC automation, you first need to create a data extension that will store the results of the query. They then write an SQL query to retrieve the data they need from the data extension or another data source and define the query activity in the automation by selecting the query and the target data extension.
Create an SQL Query activity following these steps:
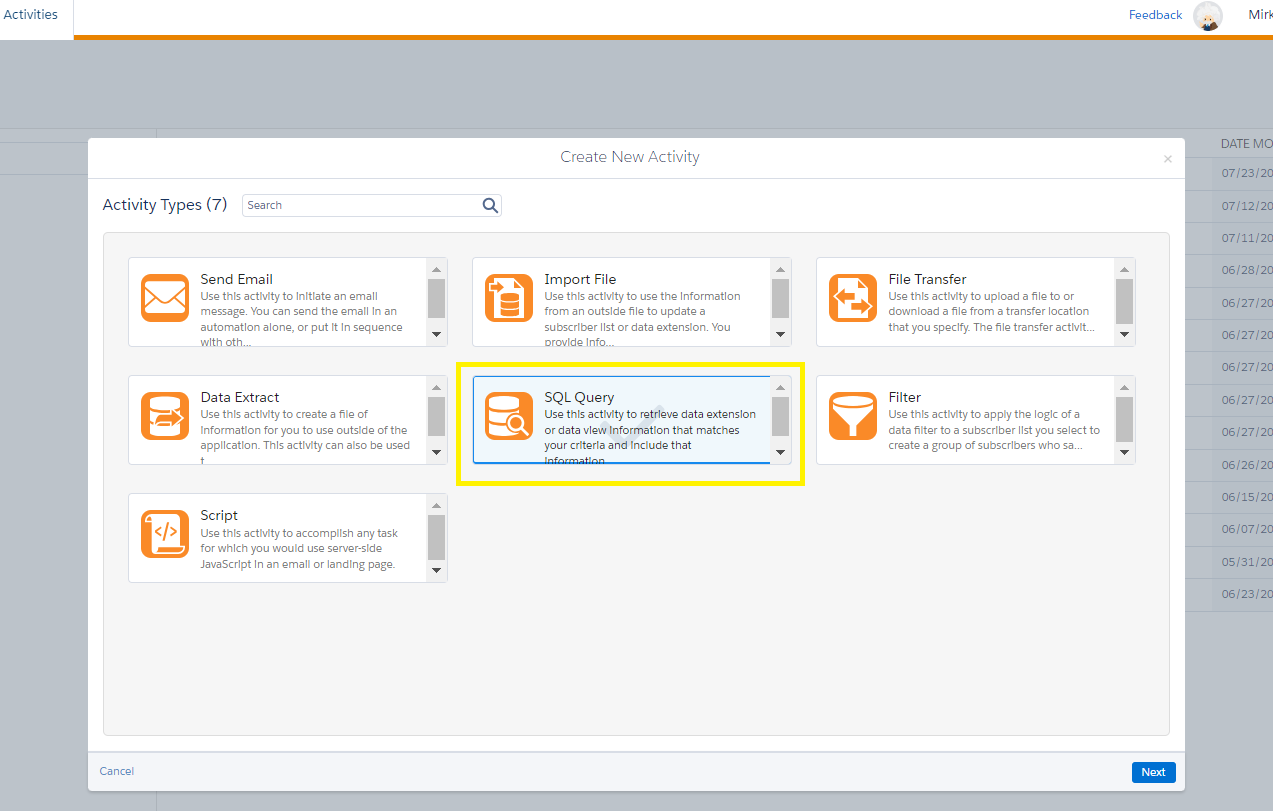
1. Click on the ‘Create Activity’ button in Automation Studio Activities tab.
2. Select the ‘SQL Query’ activity and click Next.
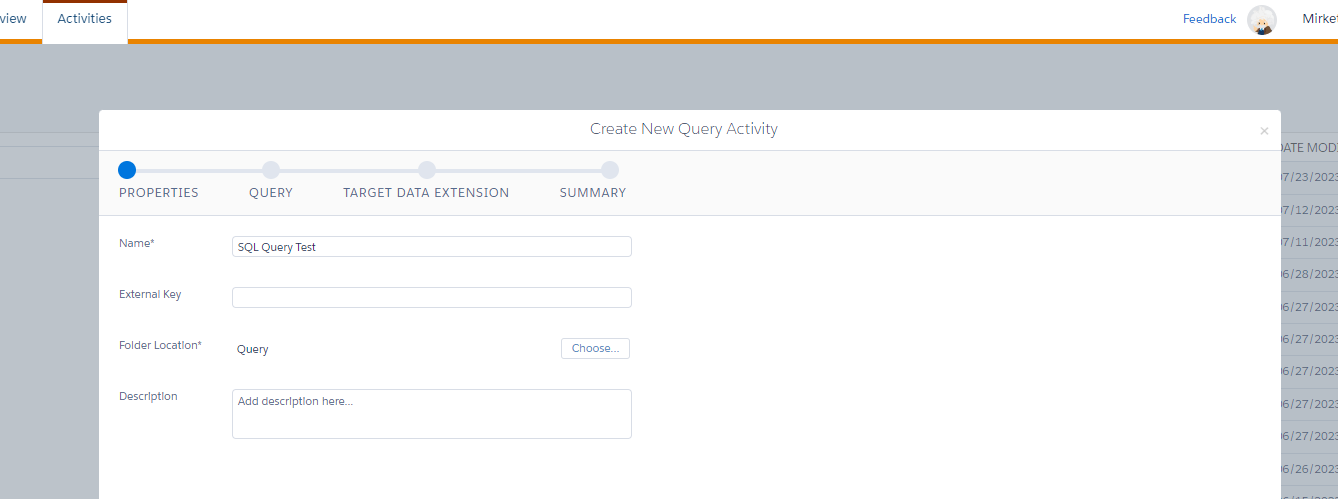
3. Fill in the name and description fields in properties section and click next.
4. In Query section write the query, then validate syntax and click next.
5. Select the target data extension and data action.
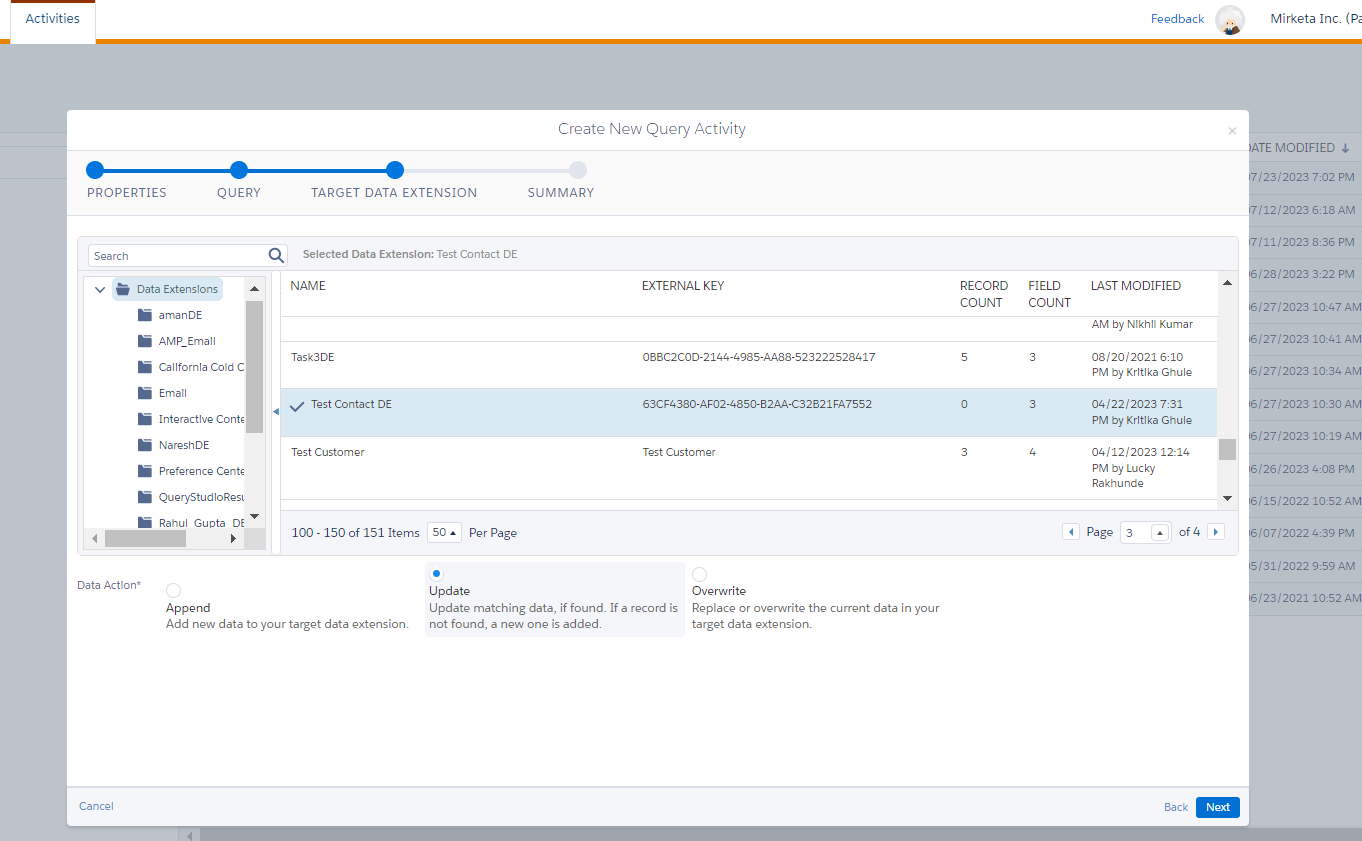
6. Review the summary and click finish.
6. Filter Activity:
Filter activity allows you to define criteria for filtering data in a data extension. You can use this activity to segment or filter your audience based on specific criteria.
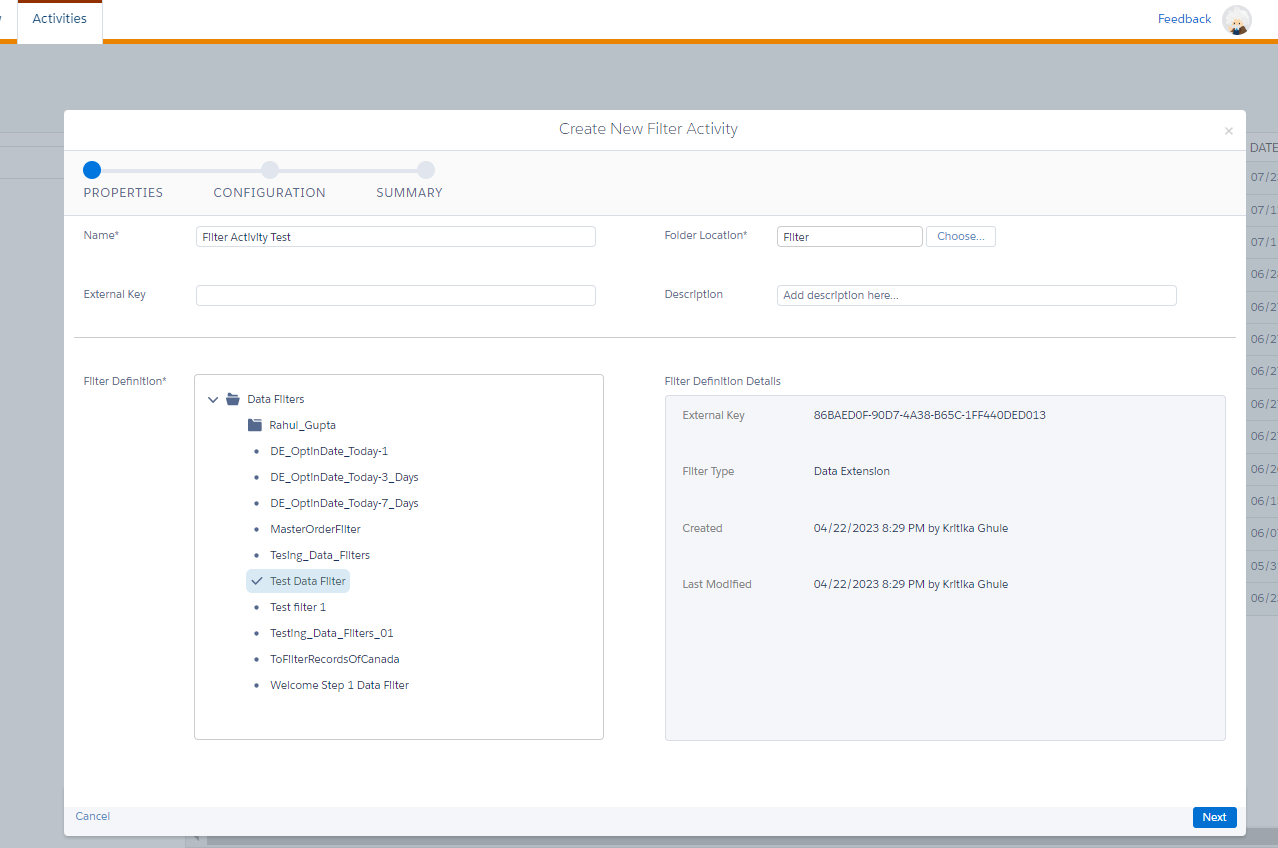
Create a Filter activity following these steps:
1. Click on the ‘Create Activity’ button in Automation Studio Activities tab.
2. Select the ‘Filter’ activity and click Next.
3. Fill in the name and description for activity and select a data filter previously created, then click next.
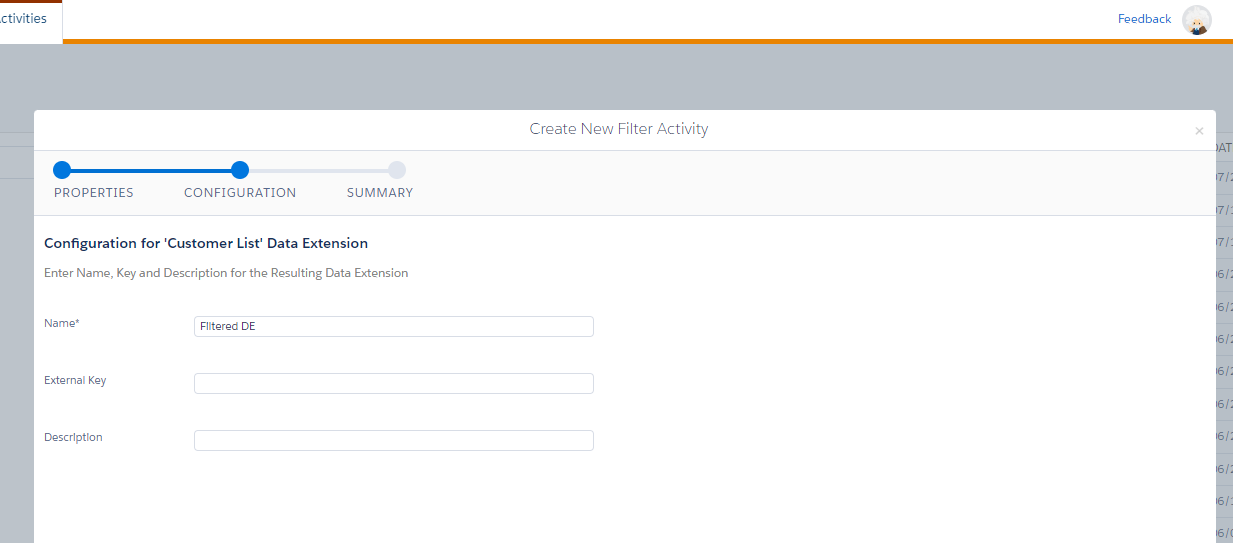
4. In configuration section enter the details of new data extension and click next.
5. Review summary section and click finish. 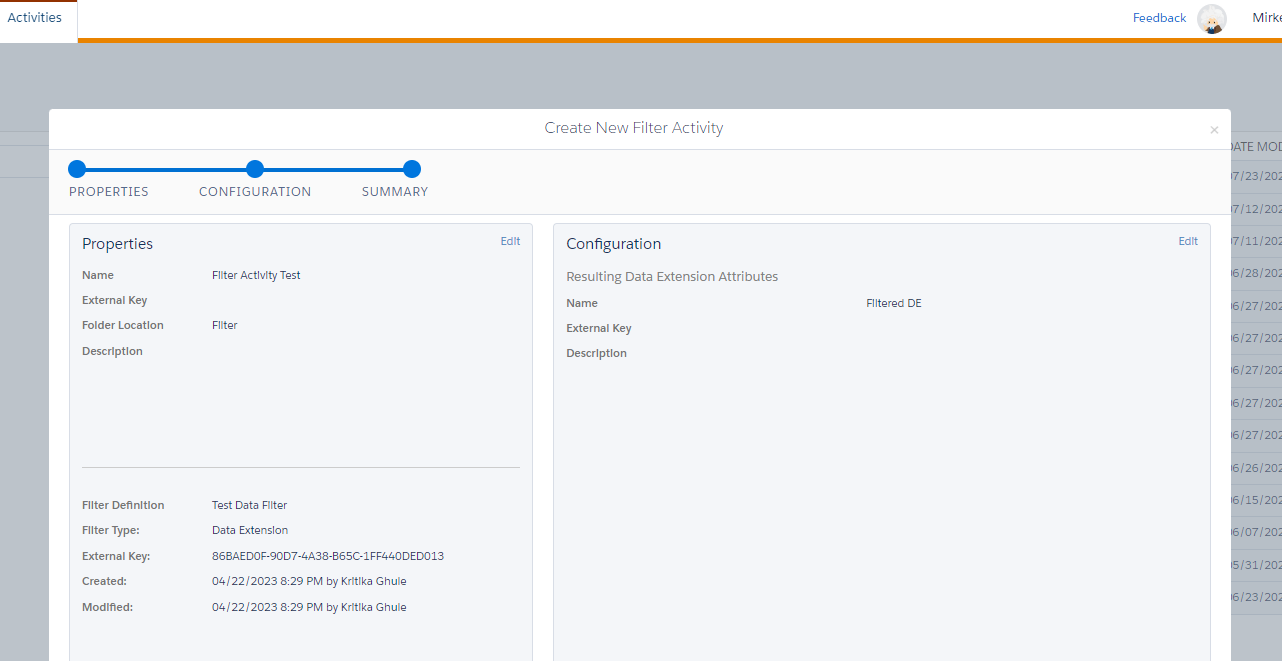
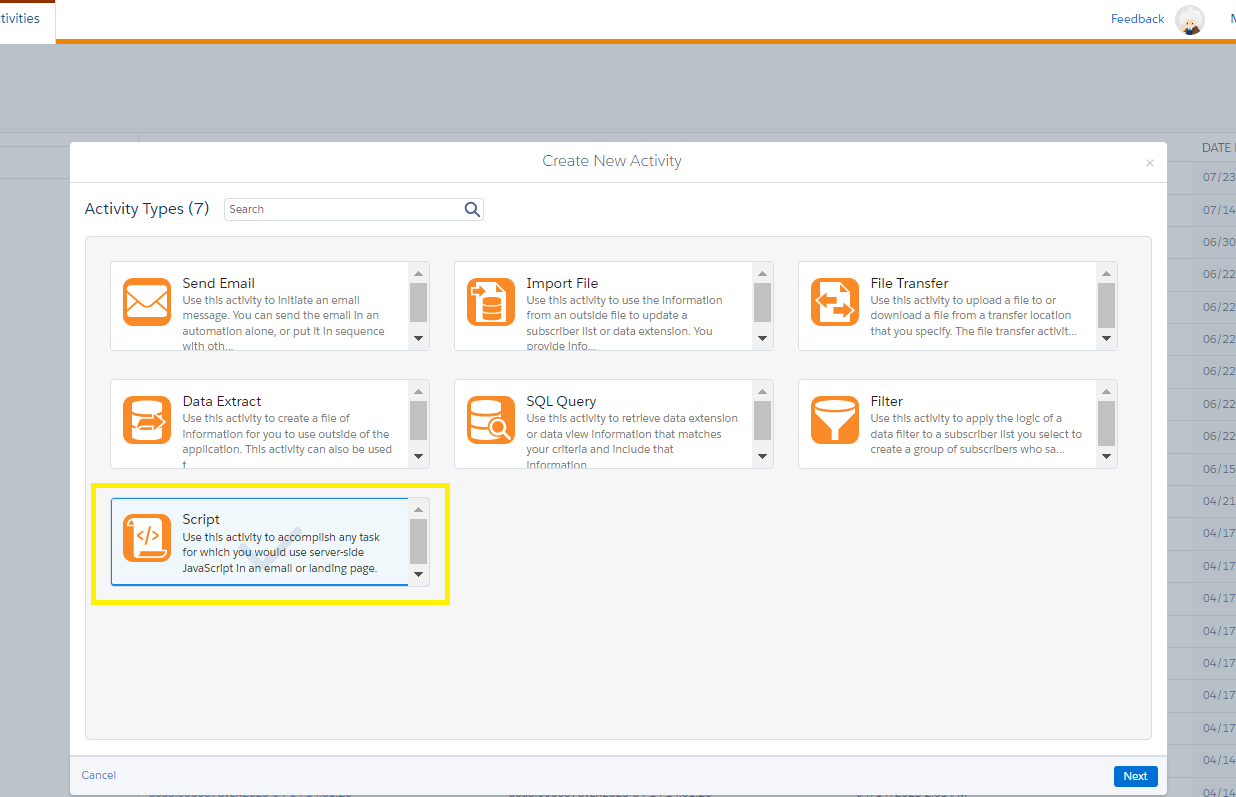
7. Script Activity:
The Script Activity allows you to execute server-side JavaScript code to perform various tasks within your marketing campaigns. It is used to perform custom processing or logic that is not natively supported by SFMC’s out-of-the-box functionality and can be used in a variety of use cases, such as data manipulation, data enrichment, and integrations with external systems.
Create a Filter activity following these steps:
1. Click on the ‘Create Activity’ button in Automation Studio Activities tab.
2. Select the ‘Script’ activity and click Next.
3. Populate name, description and write/paste your SSJS code in the box. Then validate syntax and if everything is correct click next.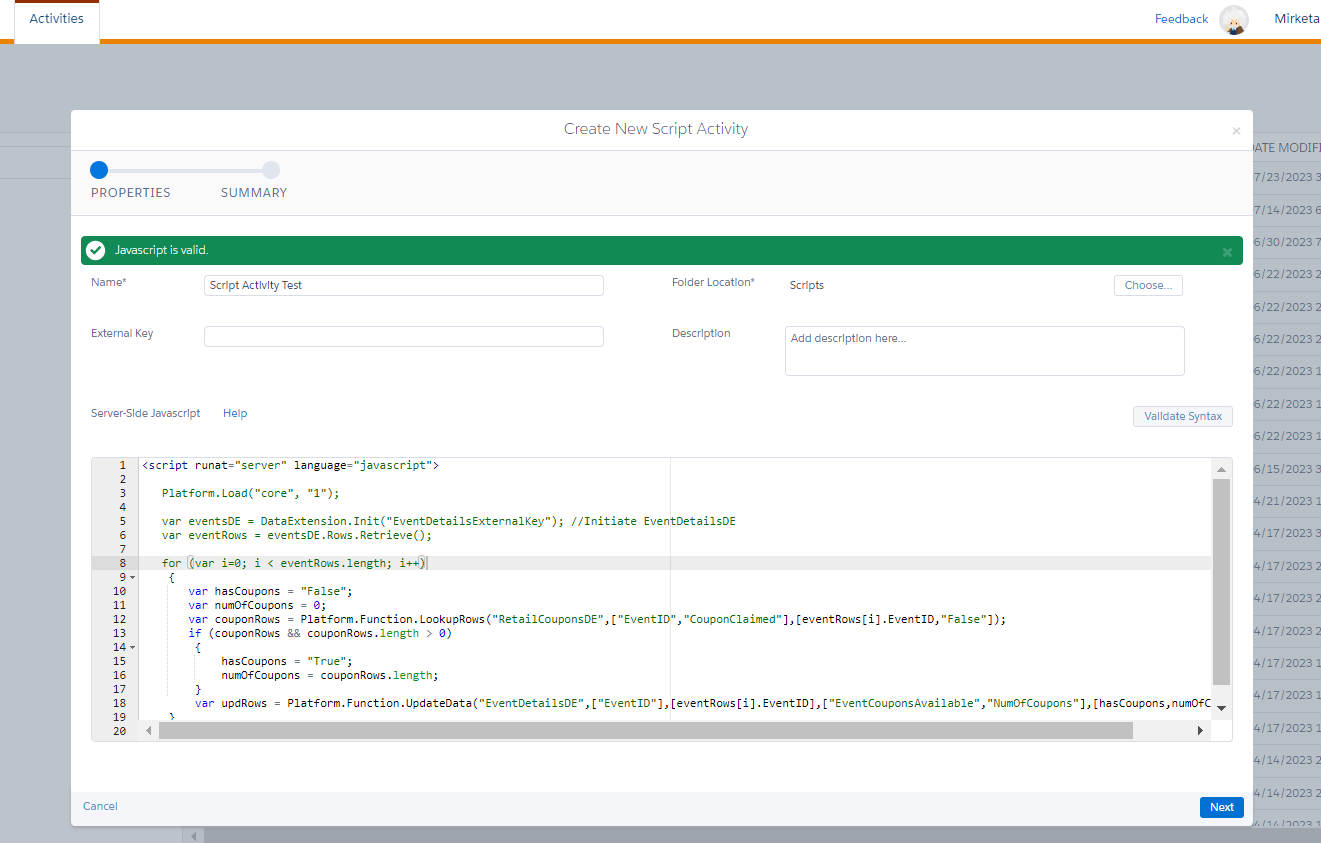
4. Review the summary and click finish to create this activity. Now it can be used in automation.
In Conclusion:
Automation activities in Salesforce Marketing Cloud (SFMC) can greatly enhance the efficiency and effectiveness of your marketing efforts. With the right automation tools and strategies, you can streamline your processes, reduce manual errors, and improve the overall quality of your campaigns. Overall, by incorporating automation activities into your SFMC marketing strategy, you can save time, increase productivity, and ultimately drive greater ROI for your business.
“SFMC automation – because the best marketing is strategic, not time-consuming.”
Leave A Comment