Outbound Message in Salesforce
Outbound message in salesforce is a kind of action that sends the information to an end-point (External Service) in the form of XML (Extensible Markup Language). It used to send object field data to your third-party application to perform the specific task as per requirement. It also played a very big role in the Integration of salesforce with any other application. You can send the outbound message using workflow, entitlement processes, or approval processes.
The best thing about the outbound message is, you do not need to write any apex code you can create it by simple point & Click. When you send any message to an end-point than it will get the information of the data in the fields which we are sending in the outbound message in the form of XML. You can use RequestBin.com which will provide you the end-point to use and you can get the XML there.
Let’s Understand the flow of Outbound Message in Salesforce from the below:

In the above figure, we can see that how actually the outbound message work in the salesforce.
First Login to Salesforce Org which is represented by the User Session, then Applies Workflow Rule on any object of your choice set the outbound message as the action of the workflow. This Outbound message will process through the internet and hit the endpoint URL than that endpoint will make a change in the other application. But it will get acknowledgment as Soap Response.
So it was all about the flow of the outbound message.
Steps to create an outbound message in salesforce:
- Go To Setup Click On Quick Search Bar and Type Workflow Rule
- Click on New Rule
- Select Object from the dropdown then click on next
- Enter Rule Name
- Set the Rule Criteria than click on Save & Next
- In Add Workflow Action Select New Outbound Message
- Enter the Name of the outbound message.
- Unique Name will out autofill but still, you can give your custom name to this field but make sure there would be no gap between two words you can use underscore( _ ) instead of blank space.
- The description is an Optional Field you can give a description if you want.
- In Endpoint URL Field Enter the endpoint URL of the recipient which will receive the message.
- Select the User To Send As from the search option.
- Check Protected Component if needed.
- Tick on Send Session-Id if you want to send the session id in the message.
- Select Available Fields of the object you selected and add that field into the
- Selected Fields by click on Add.
- Now click on Save.
- Click on Done.

Note: Before using the URL in the endpoint of outbound message make that URL Trustable by adding that URL In Remote Site Settings. Please follow the below to step to add the URL in Remote Site Settings.
- Go To Setup
- Type Remote Site Settings in the Quick Search Box.
- Click on New Remote Site in Remote Site Settings.
- Give Your Own Custom Site Name in the Remote Site Name field.
- Paste The URL in the Remote Site URL field.
- Check the Disable Protocol Security If you Want otherwise keep it Unchecked because it’s
optional. - Give Description (Optional).
- Make Sure Active Checkbox is checked.
- Click on Save.
Message Send by the outbound message is shown below:
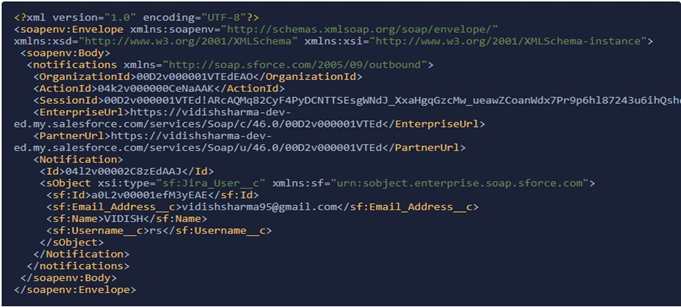
Tip To Remind :
If You Use Endpoint given by the RequestBin.com than when you track the delivery status of the message is undelivered and you will see the message in Next Item for Delivery. It will always there in the queue until your end-point return this XML file:
<soap:Envelope xmlns:soap=”http://schemas.xmlsoap.org/soap/envelope/”>
<soap:Body>
<notificationsResponse xmlns:ns2=”urn:sobject.enterprise.soap.sforce.com” xmlns=”http://soap.sforce.com/2005/09/outbound”>
<Ack>true</Ack>
</notificationsResponse>
</soap:Body>
</soap:Envelope>
Which logically impossible if you use only requestbin URL and you will receive POST Request Again And Again. To rid from this scenario go to Outbound Message Monitor Section And Delete the message from the Queue of Next Item For Delivery.
These blog very useful to beginners and experienced ones because here they mentioned like you know what is jira ticket and how git version helpful for us and also they information like you know outbound message how will work on salesforce org.
we can expect some more blogs like these mirketa .Thanks for sharing these kind of knowledge with us
and we want more blogs I Hope you can provide short time ….
Thanks in Advance ….Wish you very all the best …..Thank you so much for sharing these blog